Using Tutti

Everything from downloading and trying Tutti, to buying and activating Pro, to how each feature works. This guide covers the parts worth explaining — what each does, when you would reach for it, and how to turn it on. Features marked Pro need Tutti Pro.

1. Getting started

Download and try it free

Download Tutti, double-click the DMG, and drag it into Applications — it's signed and notarized by Apple, so it opens straight away. Your free 7-day trial starts automatically the first time you open it, with every feature unlocked. No account, no card.

Download Tutti

Buy Tutti Pro

Tutti Pro is a one-time $12.99 — no subscription — and one license covers one Mac. It unlocks the features marked Pro throughout this guide (the full Free vs Pro comparison is on the home page). Checkout is handled by Dodo Payments, and your license key is emailed right afterward.

Buy Tutti Pro

Activate Pro

Once you have your license key, open Tutti's Settings → License, paste it in, and activate. You need to be online for this one step so it can verify with the payment provider; after that, Pro stays unlocked.

Move to a new Mac

Your license covers one Mac at a time. To move it, open Settings → License on a Mac you no longer use and deactivate — that frees a slot instantly — then activate on the new Mac. There is no waiting period.

Refunds & invoices

Not for you? Email within 14 days for a no-questions-asked refund; a successful refund releases your license automatically. Dodo Payments handles receipts and invoices — reply to your receipt email, or write in if you need a formal invoice.

Email support

2. Multiple devices & output

Play to several speakers at once

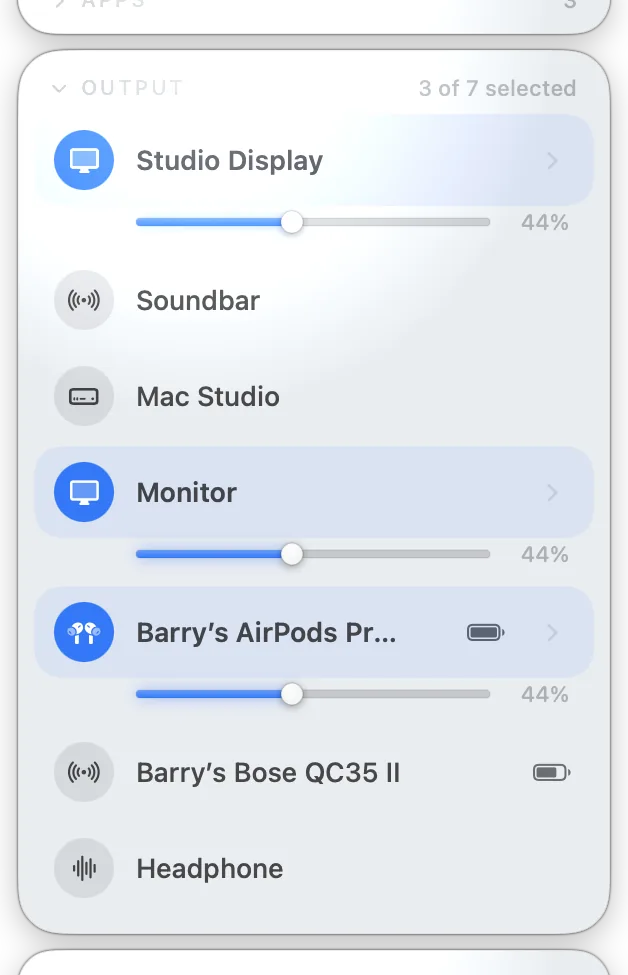
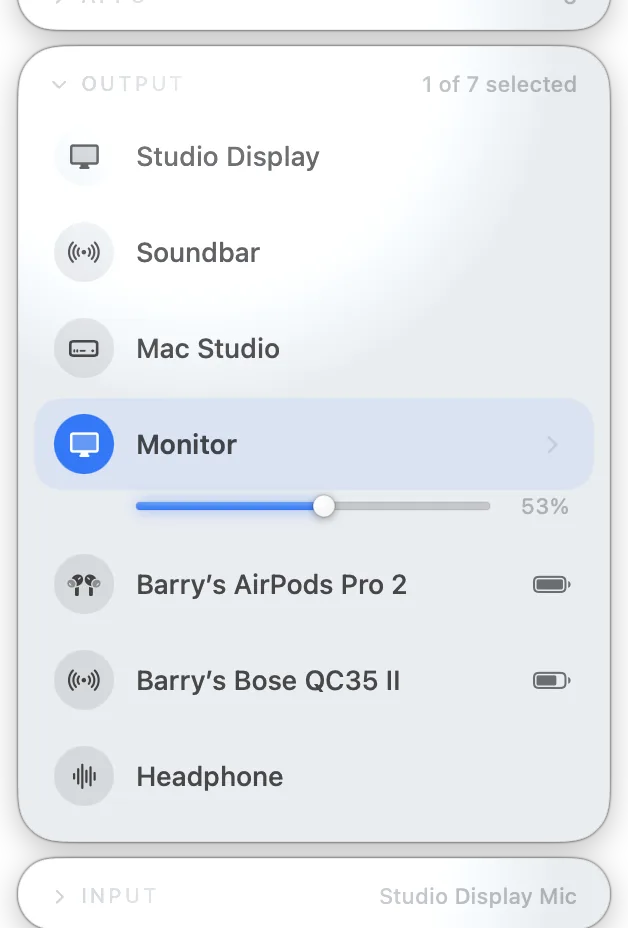
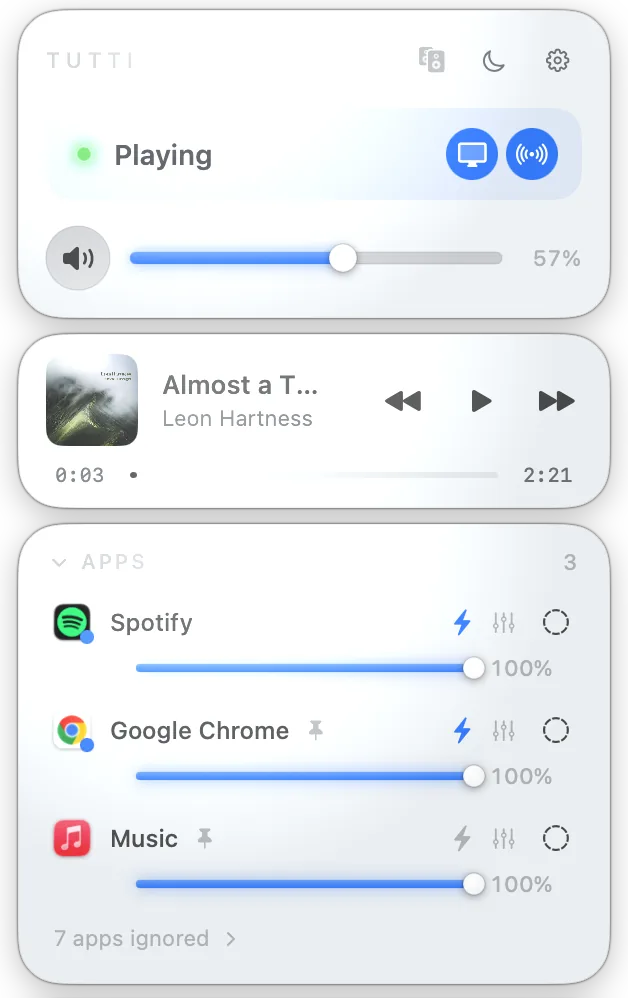
Tick a few speakers in the menu bar panel and Tutti plays the same sound through all of them together — no Audio MIDI Setup, no configuration. Reach for this when you want music in the kitchen and the living room at once, or every speaker going at a party. Open the panel and click each device you want; click again to drop one.

Read the full guide
Menu bar panel with several output devices ticked and playing together

Change speakers without a gap

Add or remove a speaker in the middle of a song and the sound keeps playing without a pause; a Bluetooth speaker that briefly drops out rejoins on its own. Use it when you carry a portable speaker from room to room, or when a flaky Bluetooth link keeps cutting out. There is nothing to switch on — just tick or untick devices while audio is playing.

Panel mid-playback while a device is being added, sound uninterrupted

Send each app to its own speaker

Pro

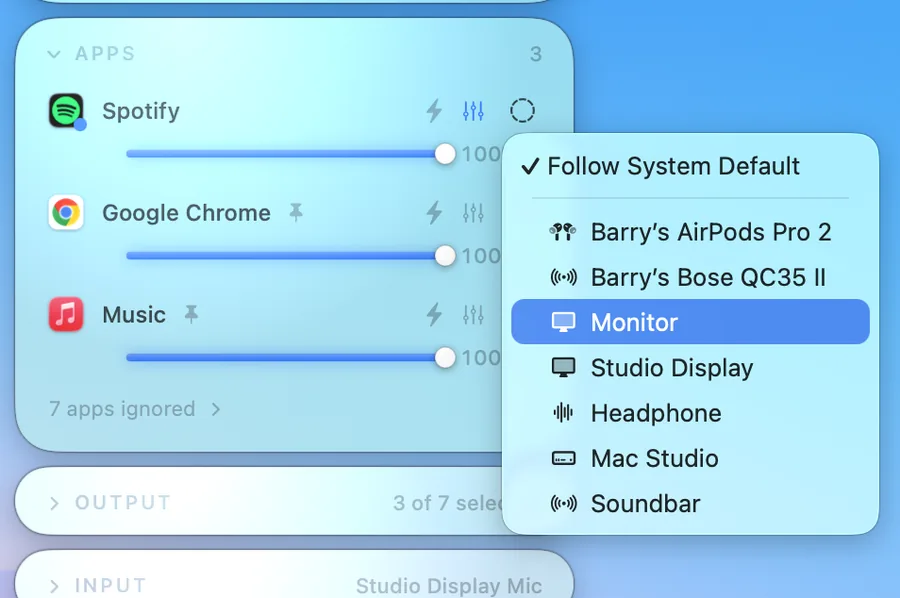
Per-app output routes each app to a different speaker — keep a video call on the laptop while music fills the room from the big speakers. Use it when different apps belong in different places. Hover an app in the panel, open its output menu, and pick where it should play. Driver-free on macOS 14.4 and later.

An app's output menu open, routing it to a specific speaker

Ignore apps you don't manage

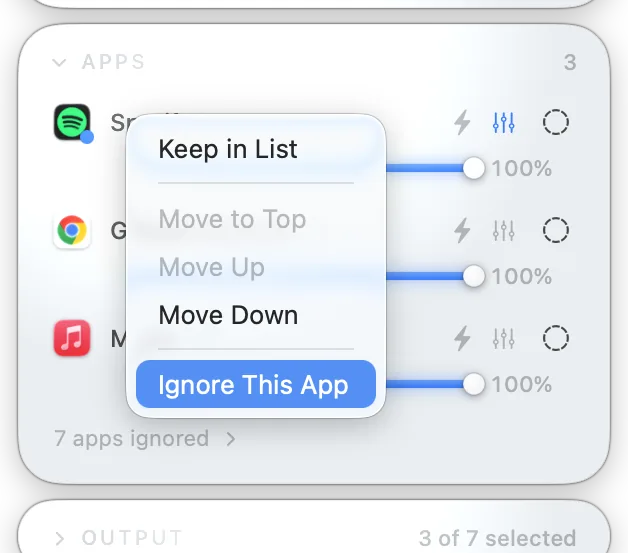
Tell Tutti to leave certain apps alone — browsers, chat apps, anything you don't want cluttering the panel or being routed. Use it to keep the app list short and focused on what you actually control. Right-click any app in the panel and choose to ignore it; bring it back any time from the bottom of the list.

Right-click menu on an app showing the Ignore option

3. Volume control

Master and per-device volume

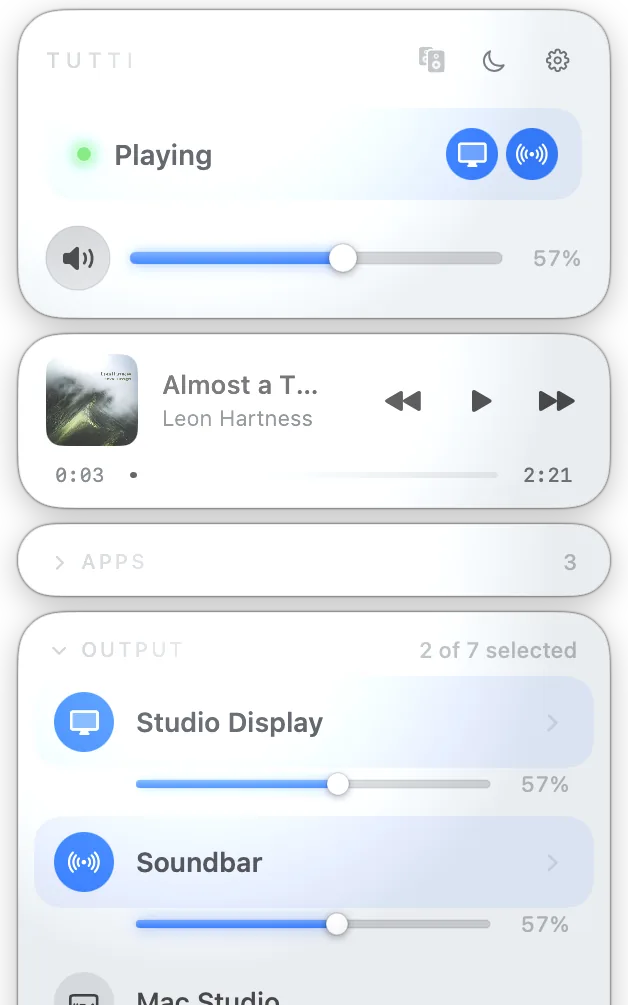
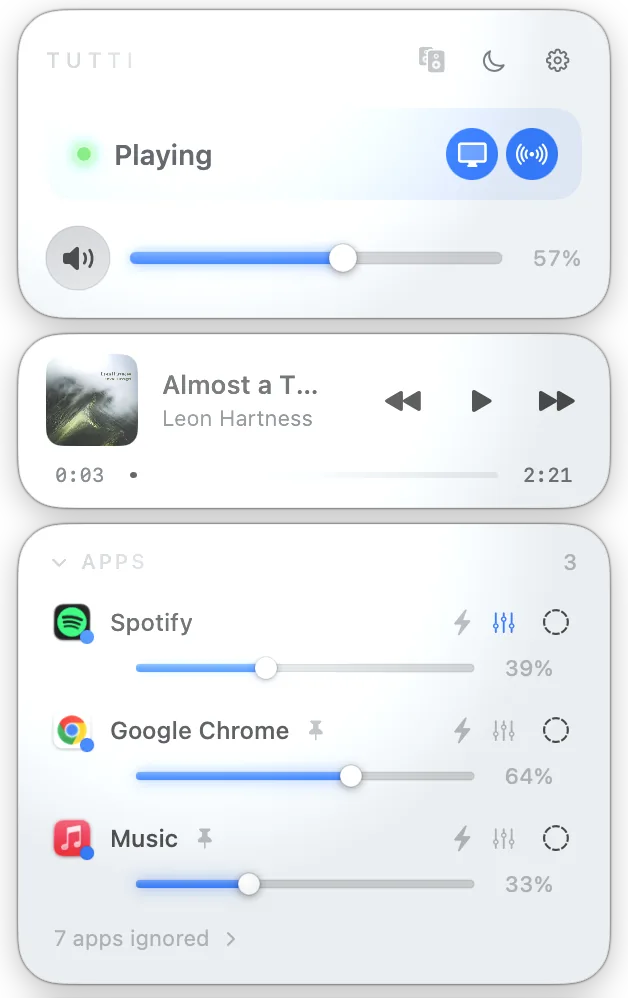
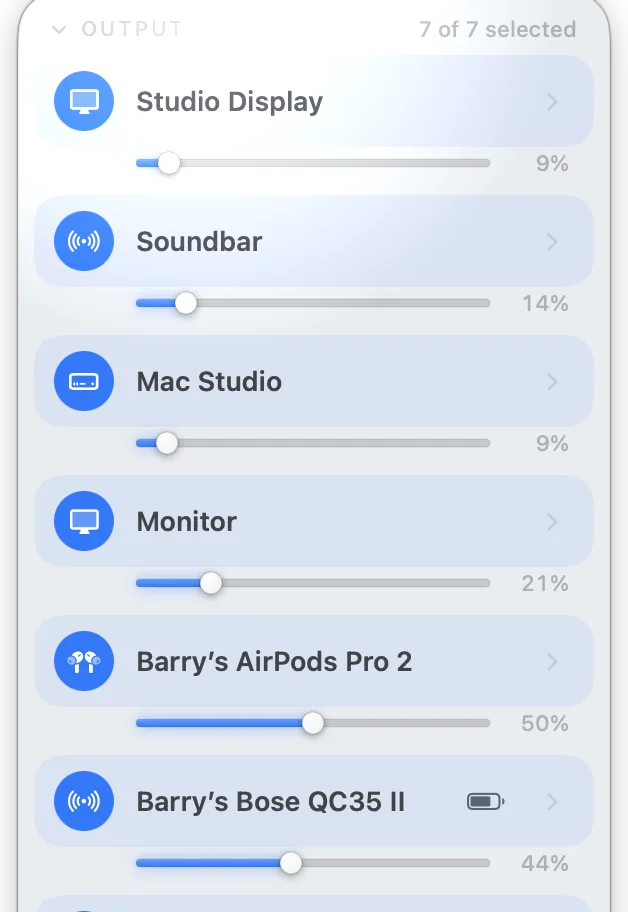
One master slider sets the level for everything at once, and each speaker gets its own slider underneath. Use it to pull one speaker down without touching the rest, or mute a single device while the others keep playing. Open the panel and drag the master at the top or any device's slider below it.

Panel showing the master slider on top and per-device sliders below

Per-app volume

Give each app its own volume — turn a game down while you talk, or pull one app to silence without muting the rest. Use it when one app is drowning out the others. Hover the app in the panel and drag its slider. On macOS 14.4 and later this works with no audio driver to install.

Read the full guide
App row with its own volume slider being dragged

External display volume

Some monitors show a lock and won't let macOS change their volume; Tutti drives their built-in speakers directly with a real slider. Use it if your display's speakers were stuck at a fixed level. Find the display in the device list and use its slider like any other. (Apple-silicon Macs.)

Read the full guide
External display listed as an output with an active volume slider

Volume keys & scroll wheel

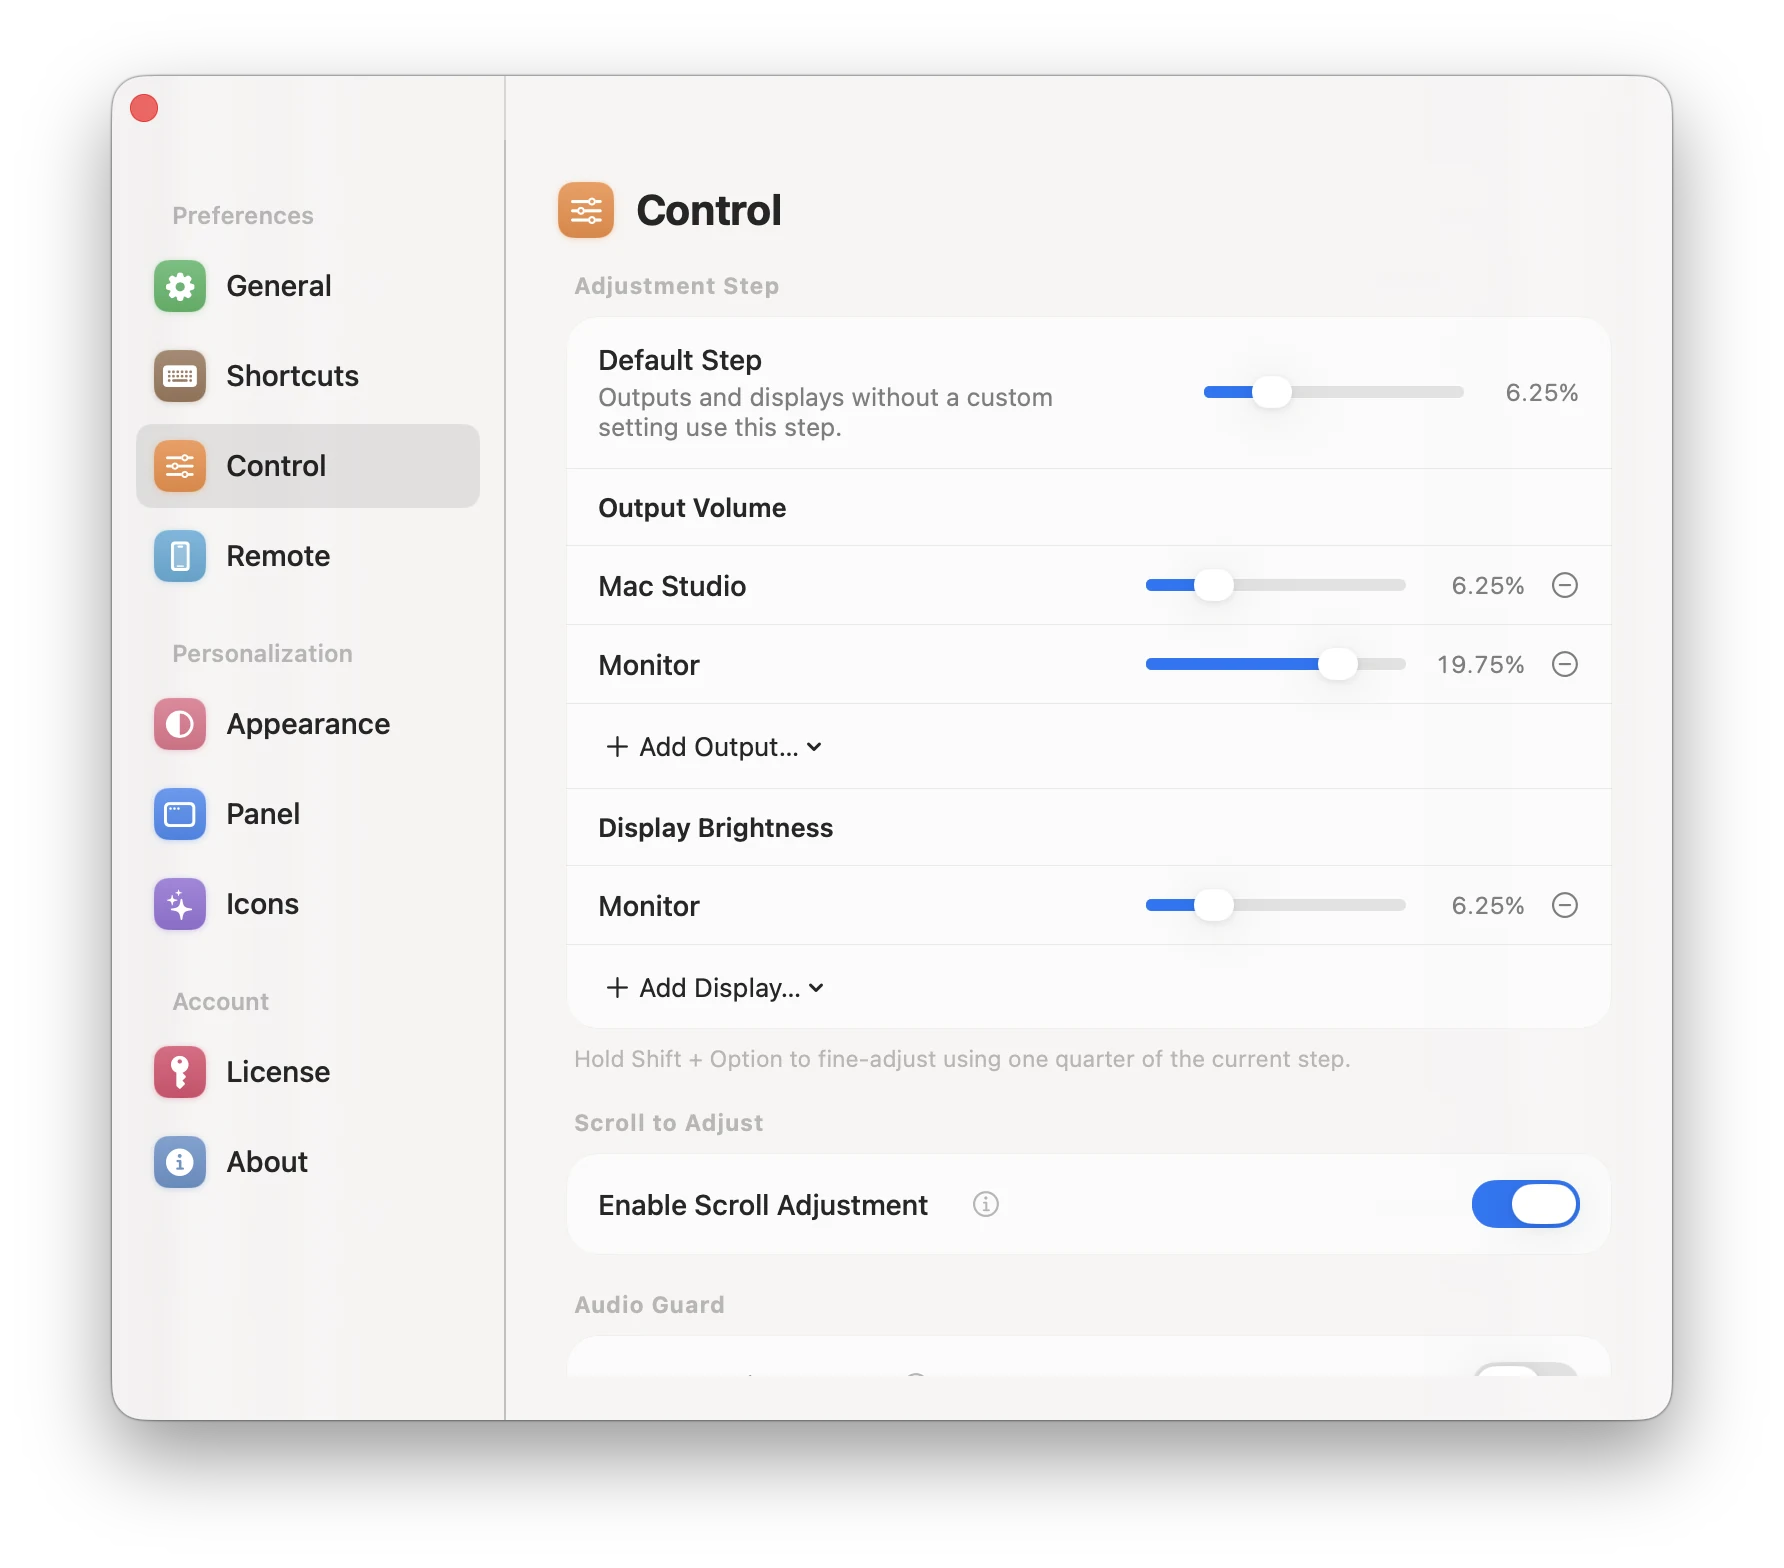
The volume keys and mouse wheel adjust the whole selected group, while the HUD shows every output or display and its result. In Settings → Control → Adjustment Step, set a Default Step or give individual outputs and displays their own step; Shift+Option uses one quarter of it for fine adjustment. Hover one device, app, or microphone to scroll only that target. You can also turn scroll adjustment off without disabling sliders or keys.

Control settings with a default adjustment step and custom steps for individual outputs and displays

Mute from the menu bar

Right-click Tutti’s menu bar icon and choose Mute All or Unmute All. Left-click the icon to open or close the full control panel.

Tutti 1.10.0 icon artwork reference comparing zero, low, high volume and red muted state

4. Display control

Control one display or the whole group

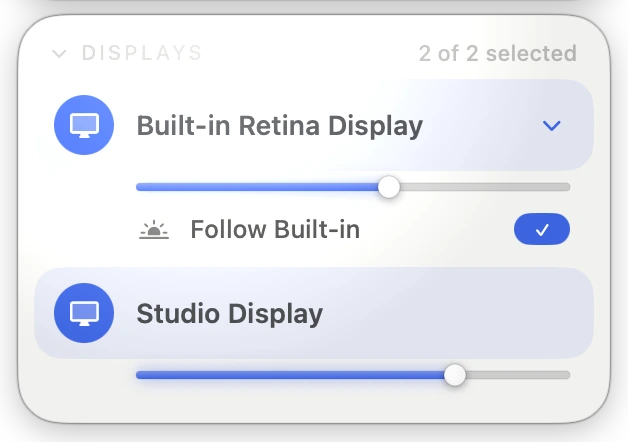
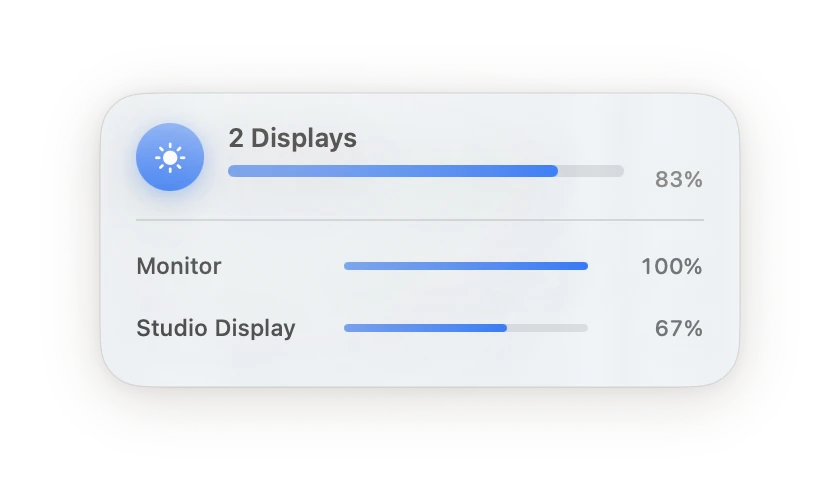
Display Control is available on macOS 15 and later and appears in the panel by default. Click a display to add or remove it from the brightness group; at least one controllable display stays selected. Use the top slider for the group, or the slider below a display for that screen alone. If you hid the card, turn it back on in Settings → Panel. Its brightness engine builds on the open-source Crisp project, with thanks to didriksg and its contributors.

View Crisp on GitHub Read the full guide
Display controls with two selected displays, individual brightness sliders, and Brightness Follow enabled

Resolution and refresh rate

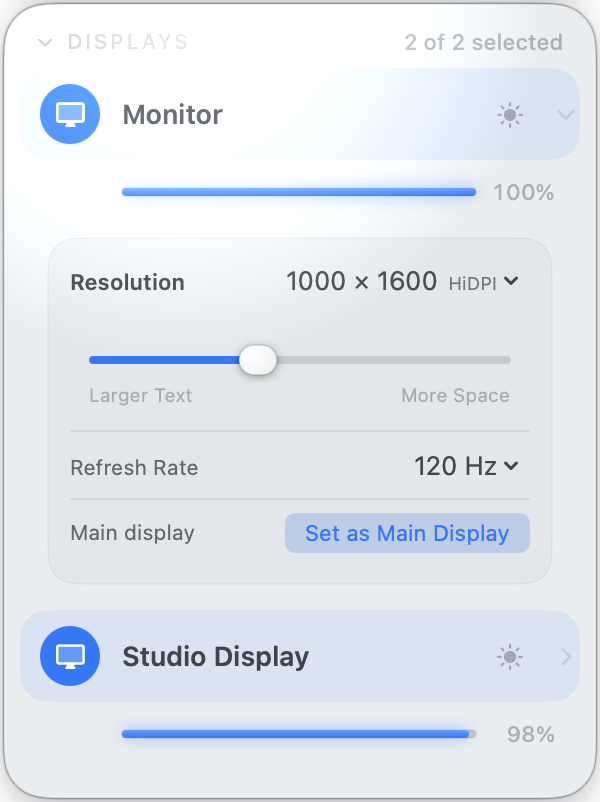
On macOS 15+, expand a display to choose resolution, existing HiDPI modes and refresh rate. Drag to preview resolution; release to apply. Keep the new mode within 15 seconds or Tutti restores the original; you can also restore manually. While confirmation or recovery is pending, mode and main-display controls are locked. Set as Main Display takes effect immediately. These controls are free and local only, without presets, Remote, shortcuts or automation.

User-provided Tutti 1.11.0 screenshot in English: expanded display controls showing resolution, HiDPI, refresh rate and Set as Main Display

Dim below minimum, or make a screen black

At night, even minimum brightness can feel too bright. On supported displays with Brightness Upscaling turned off, drag the display’s brightness slider below 15% to use Extra Dim. At 0%, the image becomes fully black—for example, when you want a secondary screen dark while using your main screen. This does not power off or disconnect the display. To bring the image back, raise that display’s brightness. Before making your only screen black, set up and test its brightness-increase shortcut in Settings → Shortcuts. With another visible screen, you can also use the Tutti panel there to raise its slider. Availability depends on the display and connection. Extra Dim can affect HDR and color accuracy; return to 15% or above for color-critical work. Extra Dim and Brightness Upscaling cannot be enabled together.

Read the full guide

Make your screen brighter in strong light

Pro

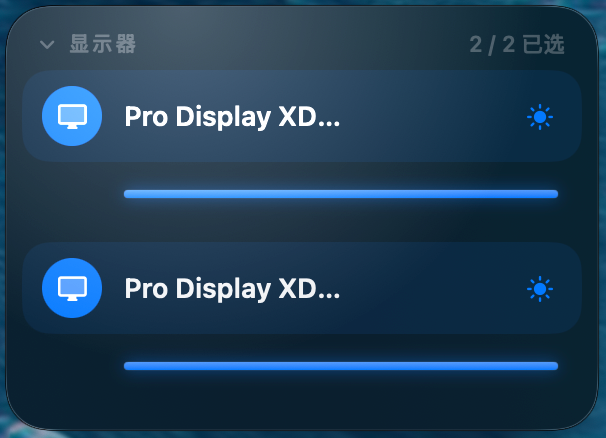
Outdoors or beside a bright window, maximum brightness may still be hard to read. Brightness Upscaling uses available headroom on eligible displays to brighten the image. In Tutti 1.11.0 on macOS 15 or later, click the sun button beside a compatible display in the Displays card, then drag that display’s own brightness slider above 100%. Pro or an active trial is required. Each screen keeps its own enablement and level. 100% is Neutral; Extra Dim and Upscaling cannot be active together.

Read the full guide
User-provided screenshot in Chinese: two Pro Display XDR rows with individual brightness sliders and the sun-shaped Upscaling buttons

Compatible displays

Pro

Tutti 1.11.0 retains the existing XDR compatibility list and also checks eligible built-in and external HDR displays for available EDR headroom. Testing includes visible gain on MacBook Neo and an R5 connected through a working Hub, plus XDR Gamma and Metal feedback. This does not certify every display, adapter or lifecycle scenario. Connections can change availability; no fixed physical brightness multiplier is promised. Built-in model identifiers: MacBookPro18,1–18,4; Mac14,5/6/9/10; Mac15,3/6/7/8/9/10/11; Mac16,1/5/6/7/8; Mac17,2/6/7/8/9. Recognized external displays: Pro Display XDR; Studio Display XDR (Apple 0x0610: 0xAE21, 0xAE22, 0xAE23, 0xAE2D, 0xAE2E, 0xAE2F, 0xAE42, 0xAE43).

Choose Gamma or Metal

Pro

Settings → Control → Advanced Display Settings chooses Gamma or Metal for compatible XDR displays only. Other eligible built-in displays automatically use Metal; eligible external displays use Gamma and may need HDR enabled. The XDR choice does not change those routes. Waiting for EDR is not HDR-content detection.

User-provided Tutti 1.11.0 screenshot in English: Advanced Display Settings with Upscaling Method set to Gamma (Recommended); this selector applies to compatible XDR displays

Save an Upscaling scene in a preset

Pro

Save a preset with the display selected to remember its Upscaling switch and level, including enabled at 100% Neutral. Applying it restores the scene; a disconnected display keeps the scene until it reconnects. A newer display command takes precedence. Group brightness, brightness keys, direct brightness shortcuts, Remote, automation, Brightness Following and scrolling stay within 100%; only the display’s own slider or an explicitly saved preset restores the Upscaling range.

HDR, color and turning it off

Pro

Upscaling can change HDR content and color accuracy. Tutti does not detect HDR content or turn Upscaling off automatically. For color-critical work, turn it off with the display’s sun button; returning the slider to 100% also restores Neutral. Turning Upscaling off or quitting Tutti removes its image adjustment.

Let external displays follow the built-in display

Expand the built-in display and turn on Follow Built-in Display. Selected external displays then move by the same amount, keeping the brightness difference you set between them. This also lets them follow ambient-light changes when automatic brightness is enabled in macOS.

Use brightness keys, shortcuts & scrolling

After Accessibility access is granted, the keyboard brightness keys control the displays selected in Tutti and show Tutti's progress HUD. Hover the group or one display and scroll to adjust that target; Shift+Option gives a finer key step. Custom brightness shortcuts are available with Pro under Settings → Shortcuts. If Tutti cannot safely take over a key press, macOS keeps handling it.

Group brightness HUD showing two displays with individual levels

Save displays in presets and control them from iPhone

Pro

Presets save the selected displays and each brightness, then restore available displays when applied; a disconnected display rejoins when it returns. Tutti Remote 1.1.0 adds a Displays page for selecting displays and changing individual or group brightness from iPhone. Both require Tutti Pro, and Display Control must be enabled on the Mac.
5. Tutti Theater & alignment

Turn on Tutti Theater

Pro

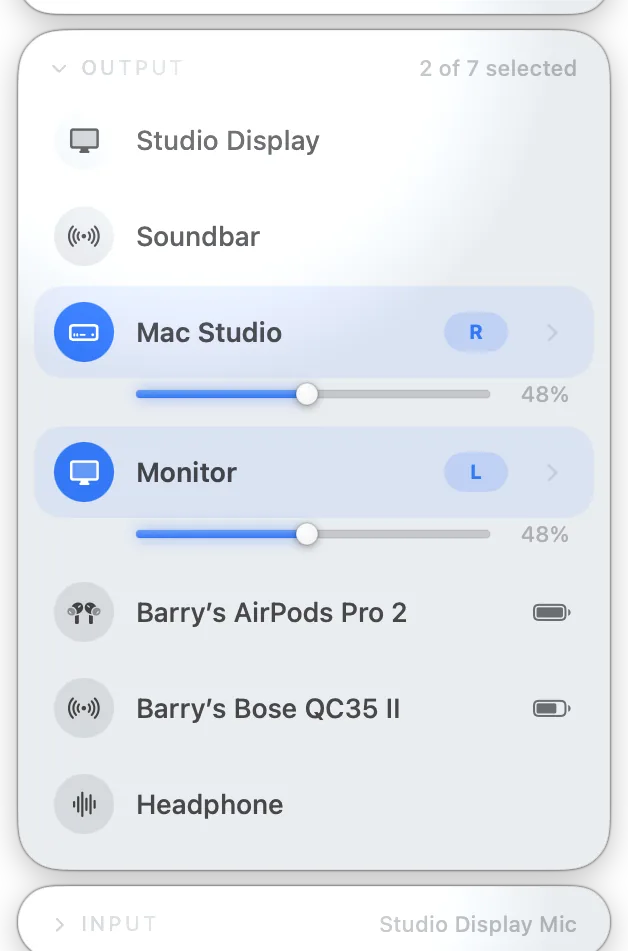
Select at least two output devices, then click the stereo icon at the top of Tutti's panel to turn on Tutti Theater. The Output section opens automatically; use the L/R badge on each selected device to assign one speaker Left and the other Right. Tutti Theater turns separate speakers into one stereo pair, with the left and right channels playing from different devices instead of every device playing the same mix. Wired, display, and Bluetooth speakers all work. While the mode is active, macOS may show “Tutti Theater” as the current output; Tutti creates and manages it automatically, so you do not need to select it yourself.

Two speakers paired as Left and Right in the panel

Balance each speaker

Pro

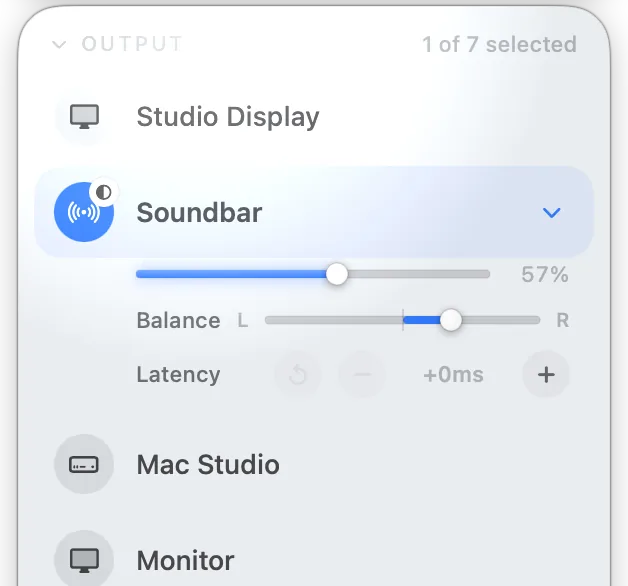
If a speaker sits off to one side, lean its sound left or right with a per-speaker balance slider so the stereo image stays centered on you. Use it when your speakers aren't symmetric around your seat. Adjust the balance slider for that device; presets remember it, alongside latency tuning.

Per-speaker balance slider leaning a device left or right

Per-device latency tuning

Pro

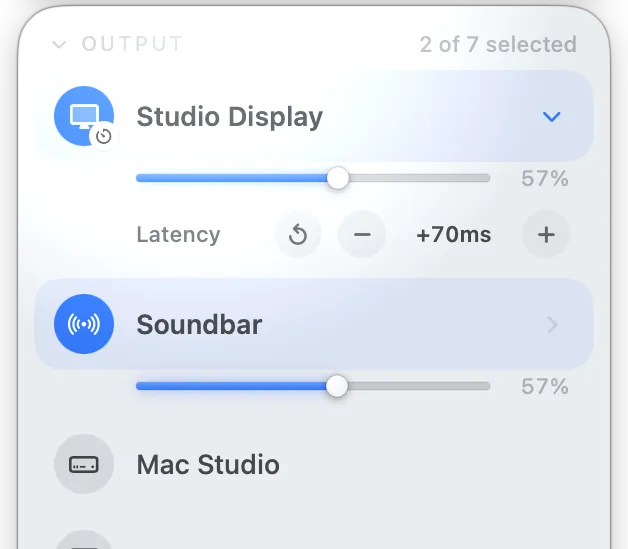
If one speaker plays later than the others, add delay to the faster outputs until they line up with it. Tutti can delay an output, but cannot make a slower Bluetooth path play sooner. Adjust each faster device by ear; Tutti remembers the setting. This may increase the overall audio delay relative to video. Tutti can compensate for a relatively stable time difference by delaying the faster output. It cannot make a slower Bluetooth speaker play sooner. Some Bluetooth devices may fall out of sync after a track change, pause/resume, reconnection or during continuous playback, even when the saved setting stays the same. If adjustment does not hold, try a wired connection or use one output. Neither restoring a saved setting nor a one-time calibration guarantees ongoing synchronization.

Read the full guide
Per-device latency control adding delay to a faster output

6. Sound quality & calls

Per-app Turbo

Some apps are simply too quiet; Turbo gives one app a 2× boost so it carries over everything else. Use it when a video or game is faint even at full volume. Hover the app in the panel and switch Turbo on. Driver-free on macOS 14.4 and later.

Turbo toggle switched on for one app in the panel

Per-app equalizer

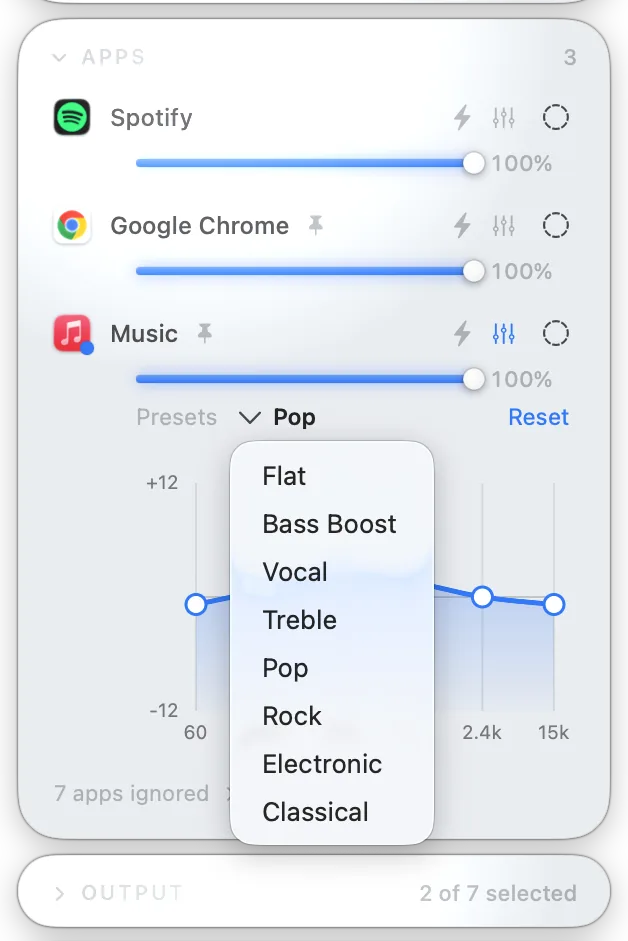
Shape bass, mids, and treble for any single app right in the panel, or apply a built-in preset. Use it to warm up thin laptop speakers or tame harsh audio from one app without affecting the others. Open the app's EQ in the panel and adjust the bands. Driver-free on macOS 14.4 and later.

Per-app equalizer with bass/mid/treble bands in the panel

Steps aside for calls and video

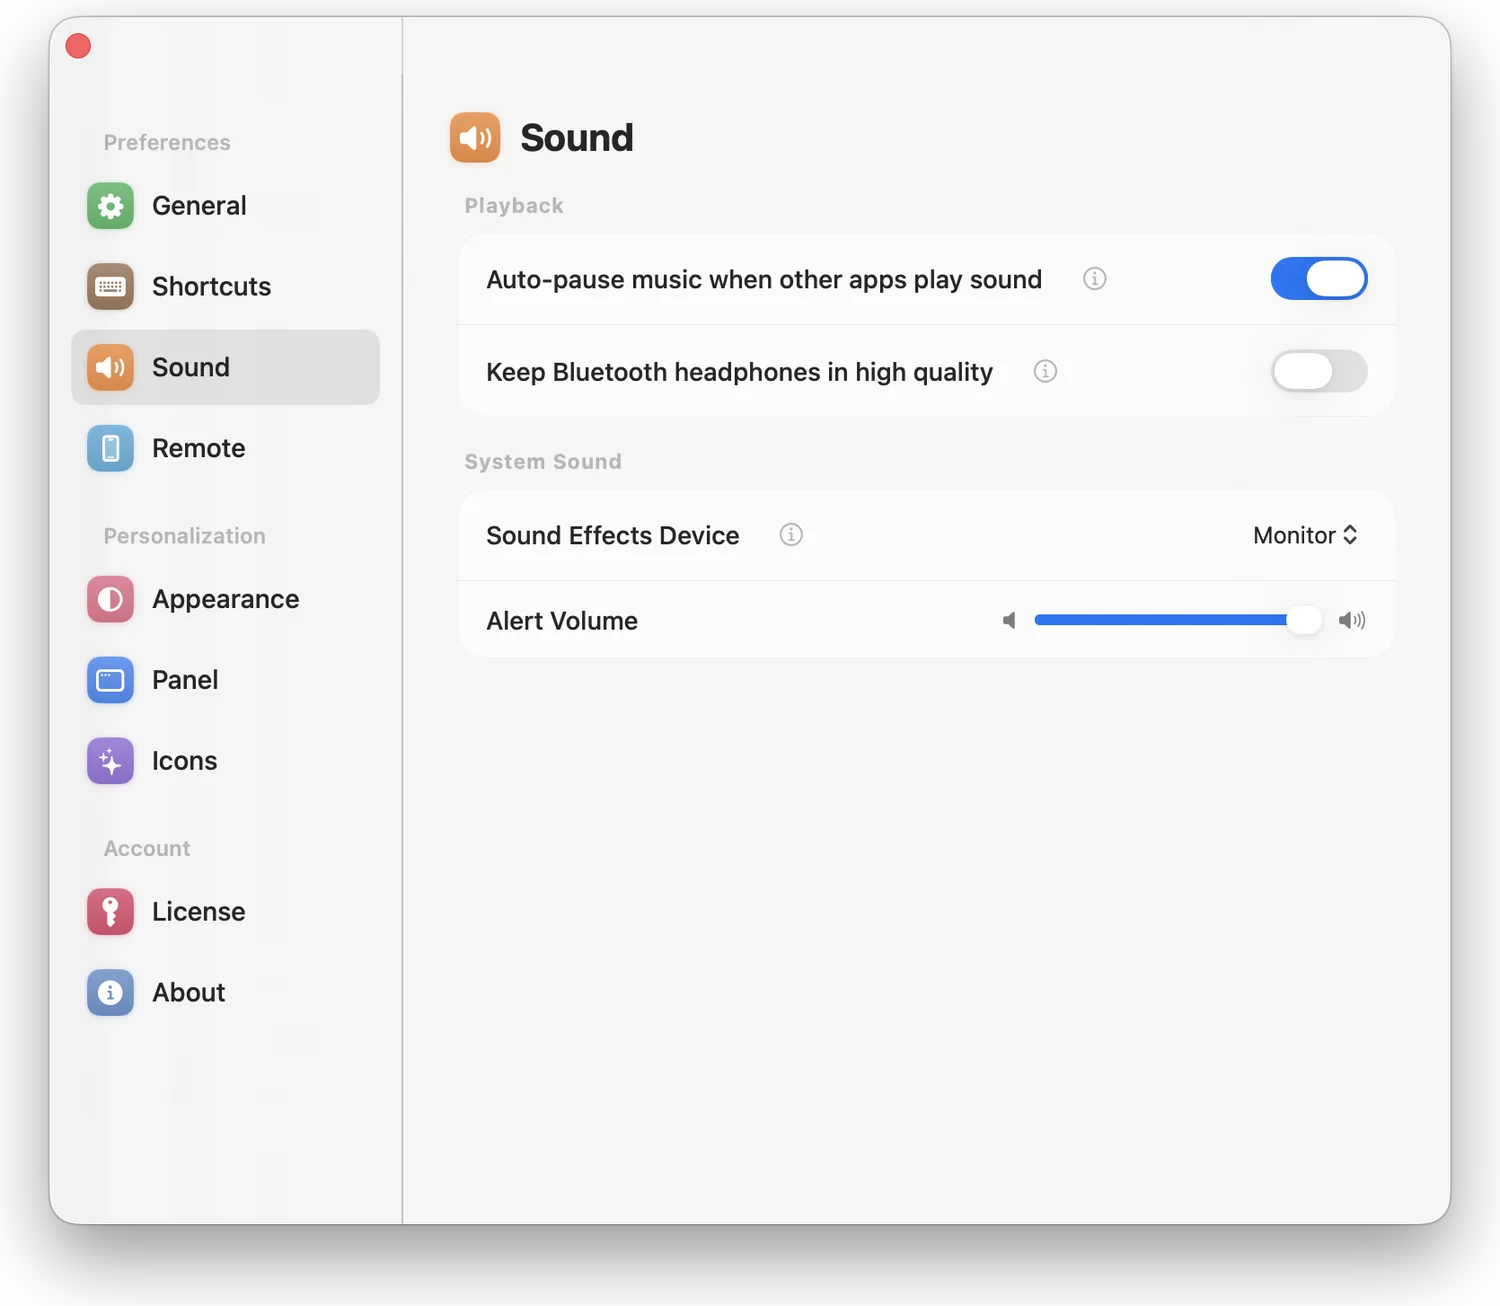
When a video, meeting, or call starts playing sound, Tutti fades your music out and pauses it, then fades it back in exactly where you left off. Use it so you never have to scramble to pause your music when a call comes in. Turn it on once; it works with Spotify and Apple Music.

Music fading and pausing as a call takes over

Keeps headphones crisp after calls

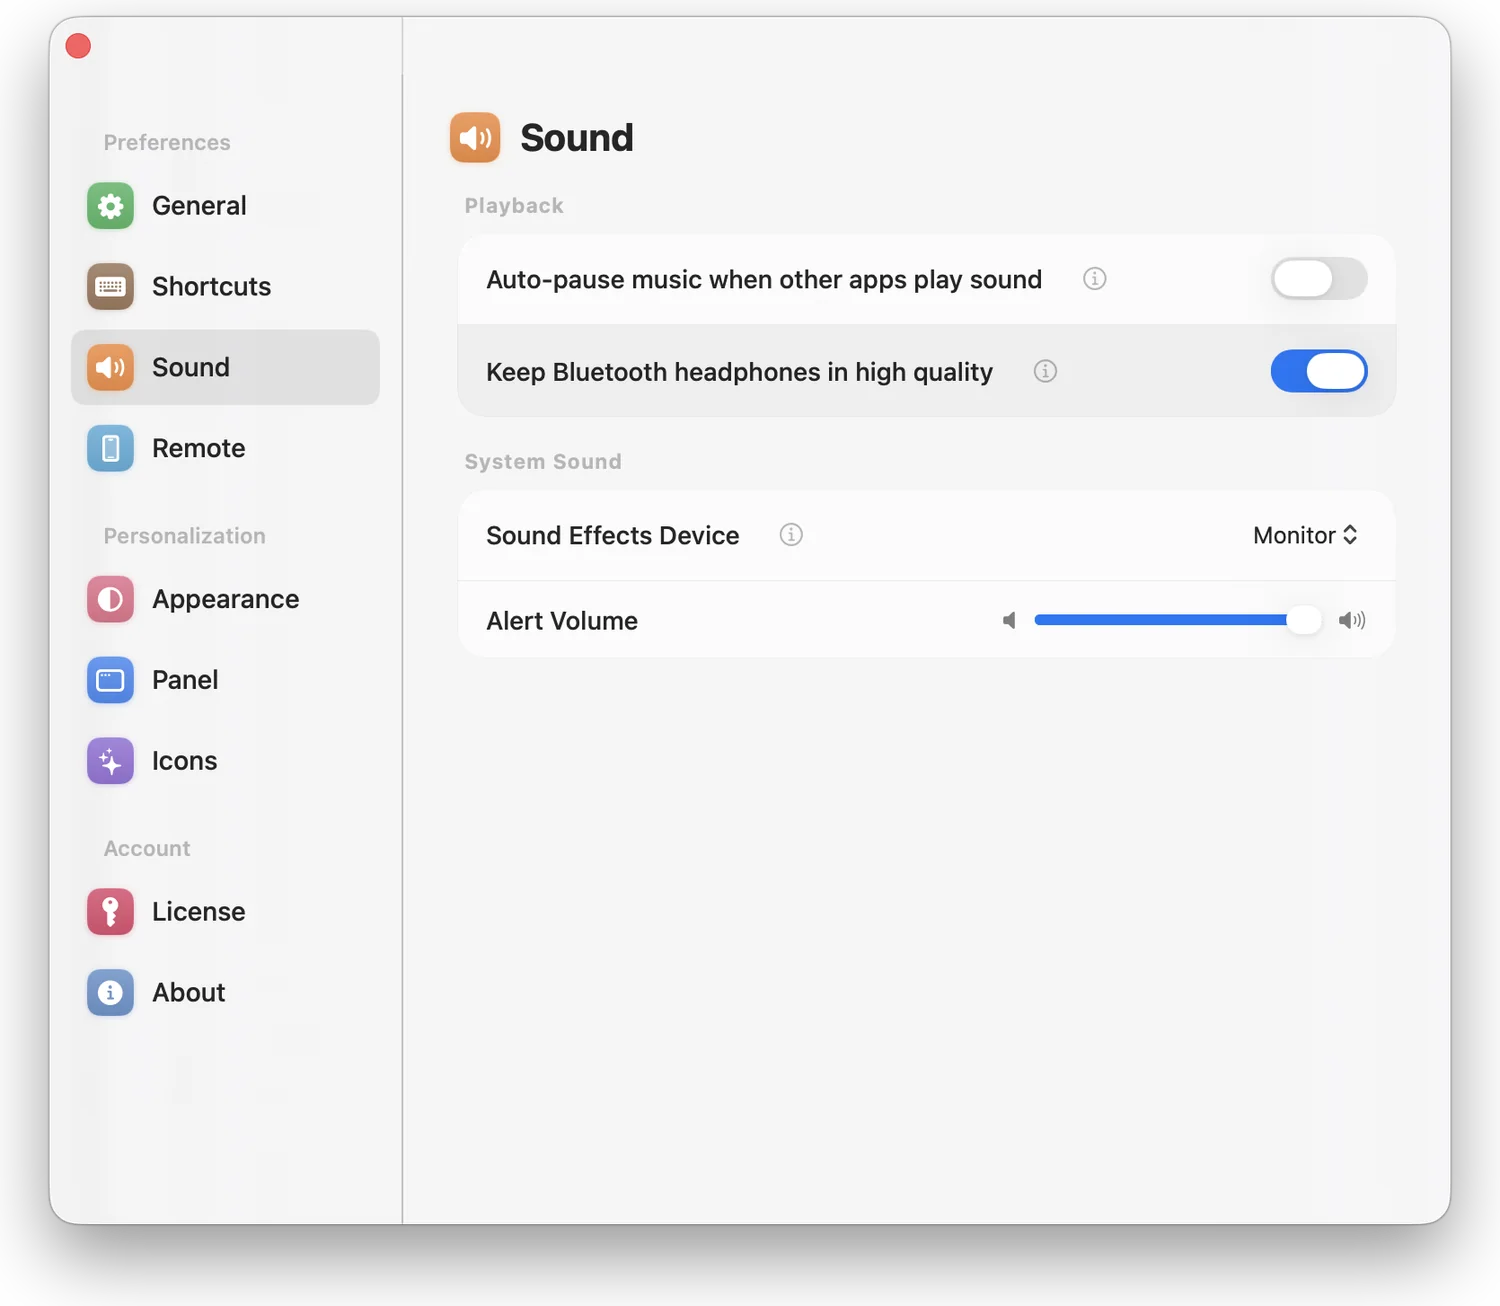
Bluetooth headphones normally drop to muffled call-quality audio during a meeting and stay that way; turn this on and Tutti uses your Mac's built-in mic instead, so your headphones keep full sound quality. Use it if music sounds flat after a video call. Enable it and Tutti handles the switch for you.

Setting that keeps Bluetooth headphones in high quality during calls

7. Device Guard

Keep your audio setup in place

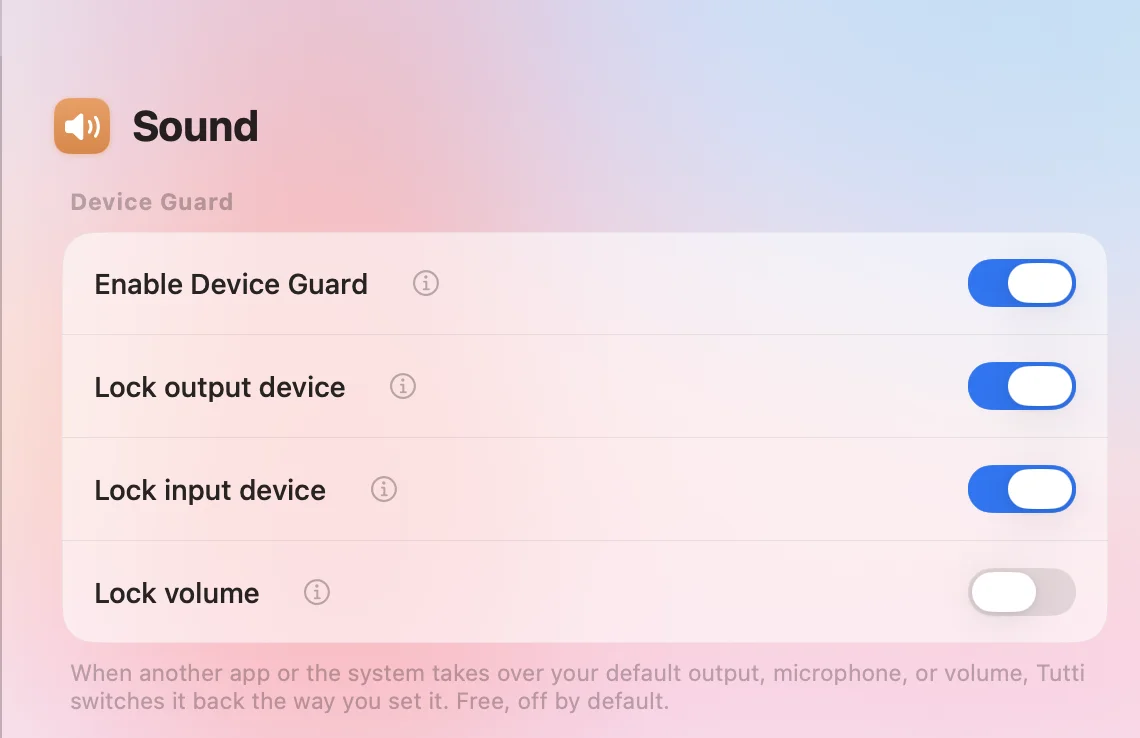
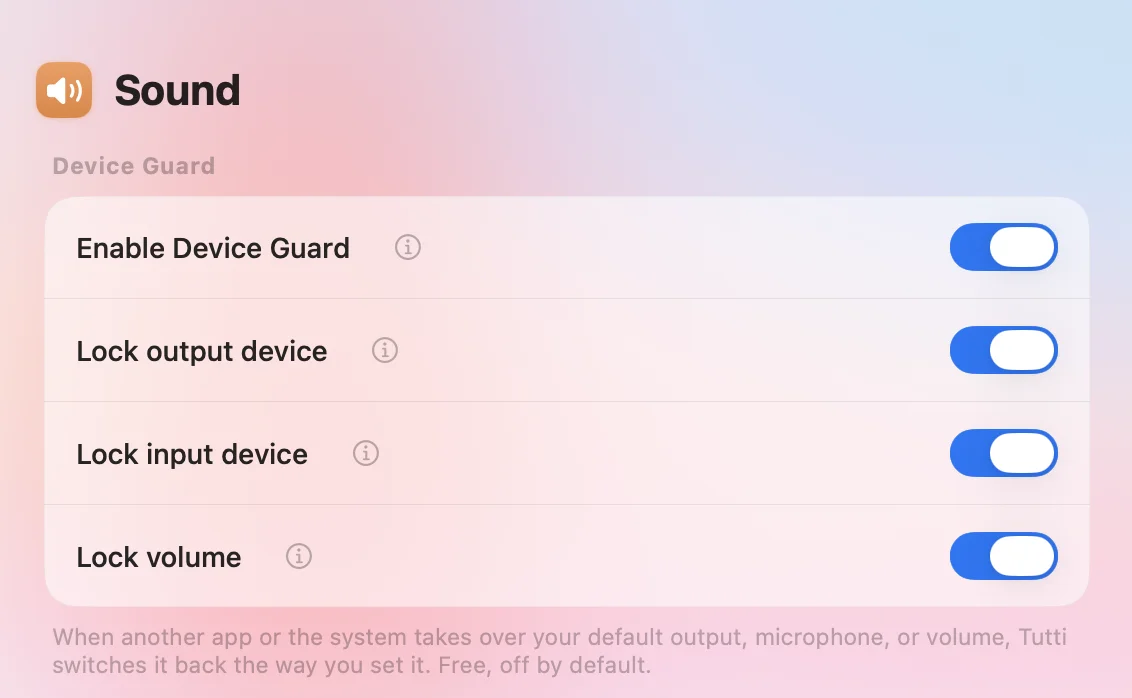
Apps and macOS sometimes change your output, mic, or volume. Device Guard restores your choices. Changes made in Tutti become the new choice; automatic switches when a device connects still follow output priority. Free and off by default.

Device Guard in Settings with the enable switch and lock toggles

A priority order for your outputs

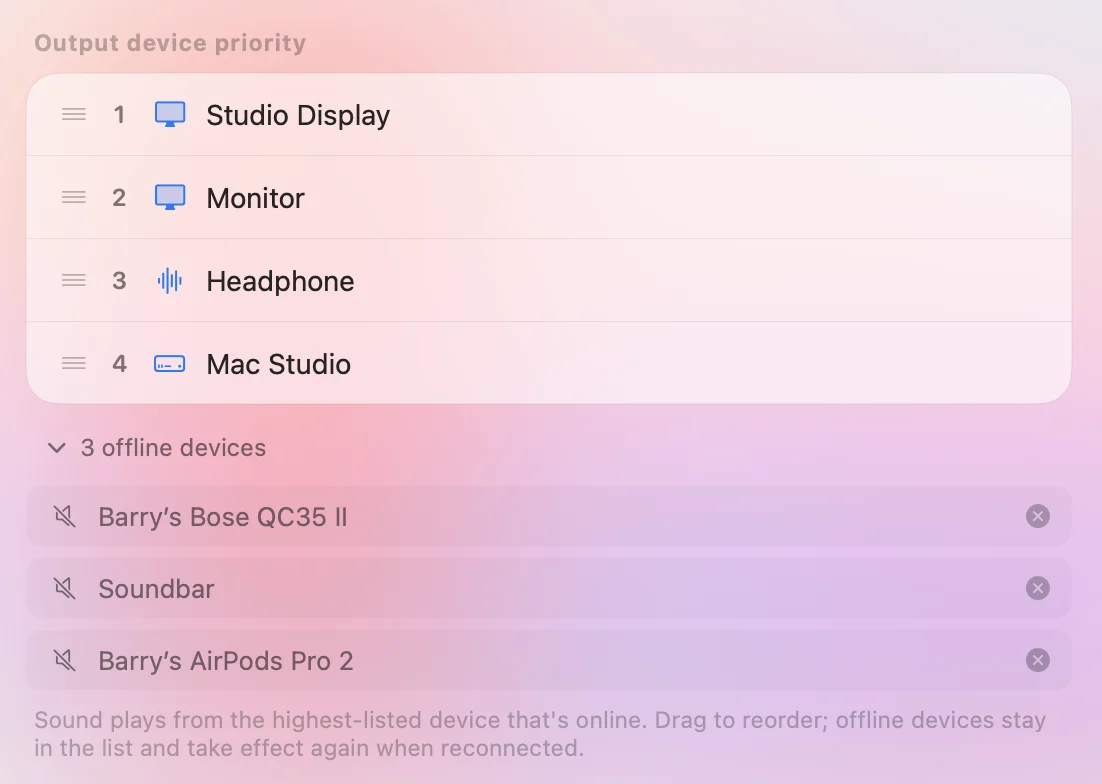
Rank outputs under Lock output device. After an automatic switch, Tutti returns to the top available device. Put AirPods first to use them whenever connected; otherwise it uses the next device. To choose case by case, leave this lock off.

Output priority list with devices dragged into order

Lock the microphone and volume

Lock input device stops meeting apps like Zoom from quietly switching your microphone mid-call, and Lock volume restores your level when an app cranks it up or drops it to zero. Each time Device Guard puts something back, a brief notice appears on screen so you know what happened; turn that off with "Show a notice when devices are auto-adjusted" in the Appearance tab.

Input and volume locks on, with the brief on-screen notice

8. Presets & automation

Save device sets as presets

Pro

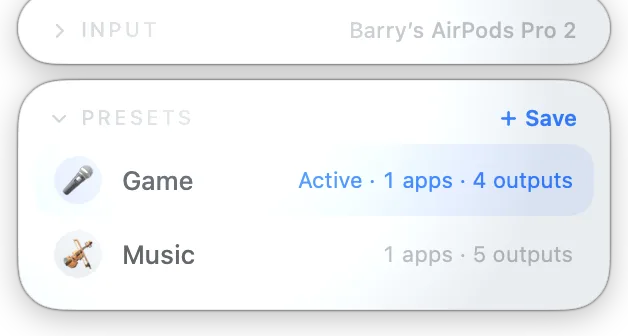
Save a whole setup — which speakers are on, plus each app's volume and output — and recall it in one tap, switching freely between music, movies, and work. Use it to jump between a party setup and a focus setup instantly. Arrange the panel the way you want, then save it as a preset; each one gets its own emoji so they're easy to tell apart.

Preset row with emoji icons, one being recalled

Shortcuts, Siri & Spotlight

Pro

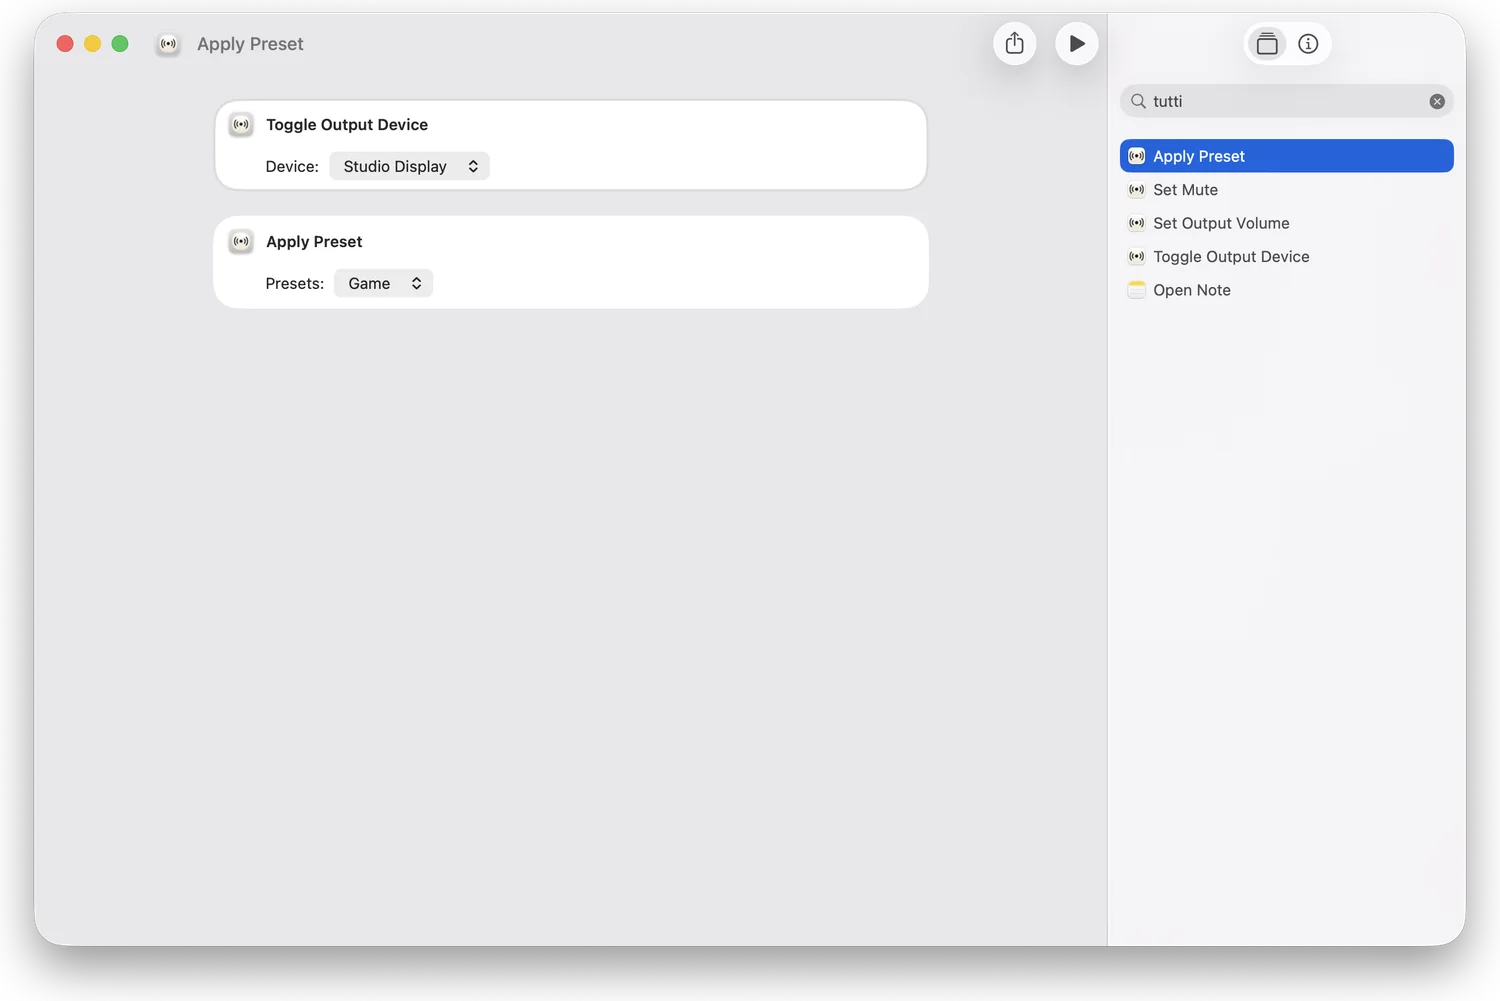
Control Tutti from the Shortcuts app, by asking Siri, or straight from Spotlight — switch presets, mute, or set the volume, and wire it into your own automations. Use it to trigger a setup from a hotkey, a routine, or your voice. Add Tutti's actions in Shortcuts, or just start typing a command in Spotlight.

ActionParametersSiri phrase
Apply presetPreset (required)
  • “ Apply preset preset in Tutti ”
  • “ Switch to preset in Tutti ”
Set muteMute / unmute / toggle (default: toggle)
  • “ Toggle mute in Tutti ”
Set output volumeVolume 0–100 (default: 50)
  • “ Set Tutti volume ”

Said to Siri, this uses the default 50% — set your own value in the Shortcuts app action.

Toggle output deviceDevice (required)Shortcuts app only — no voice phrase
Tutti actions listed in the Shortcuts app / Spotlight

Global shortcuts

Pro

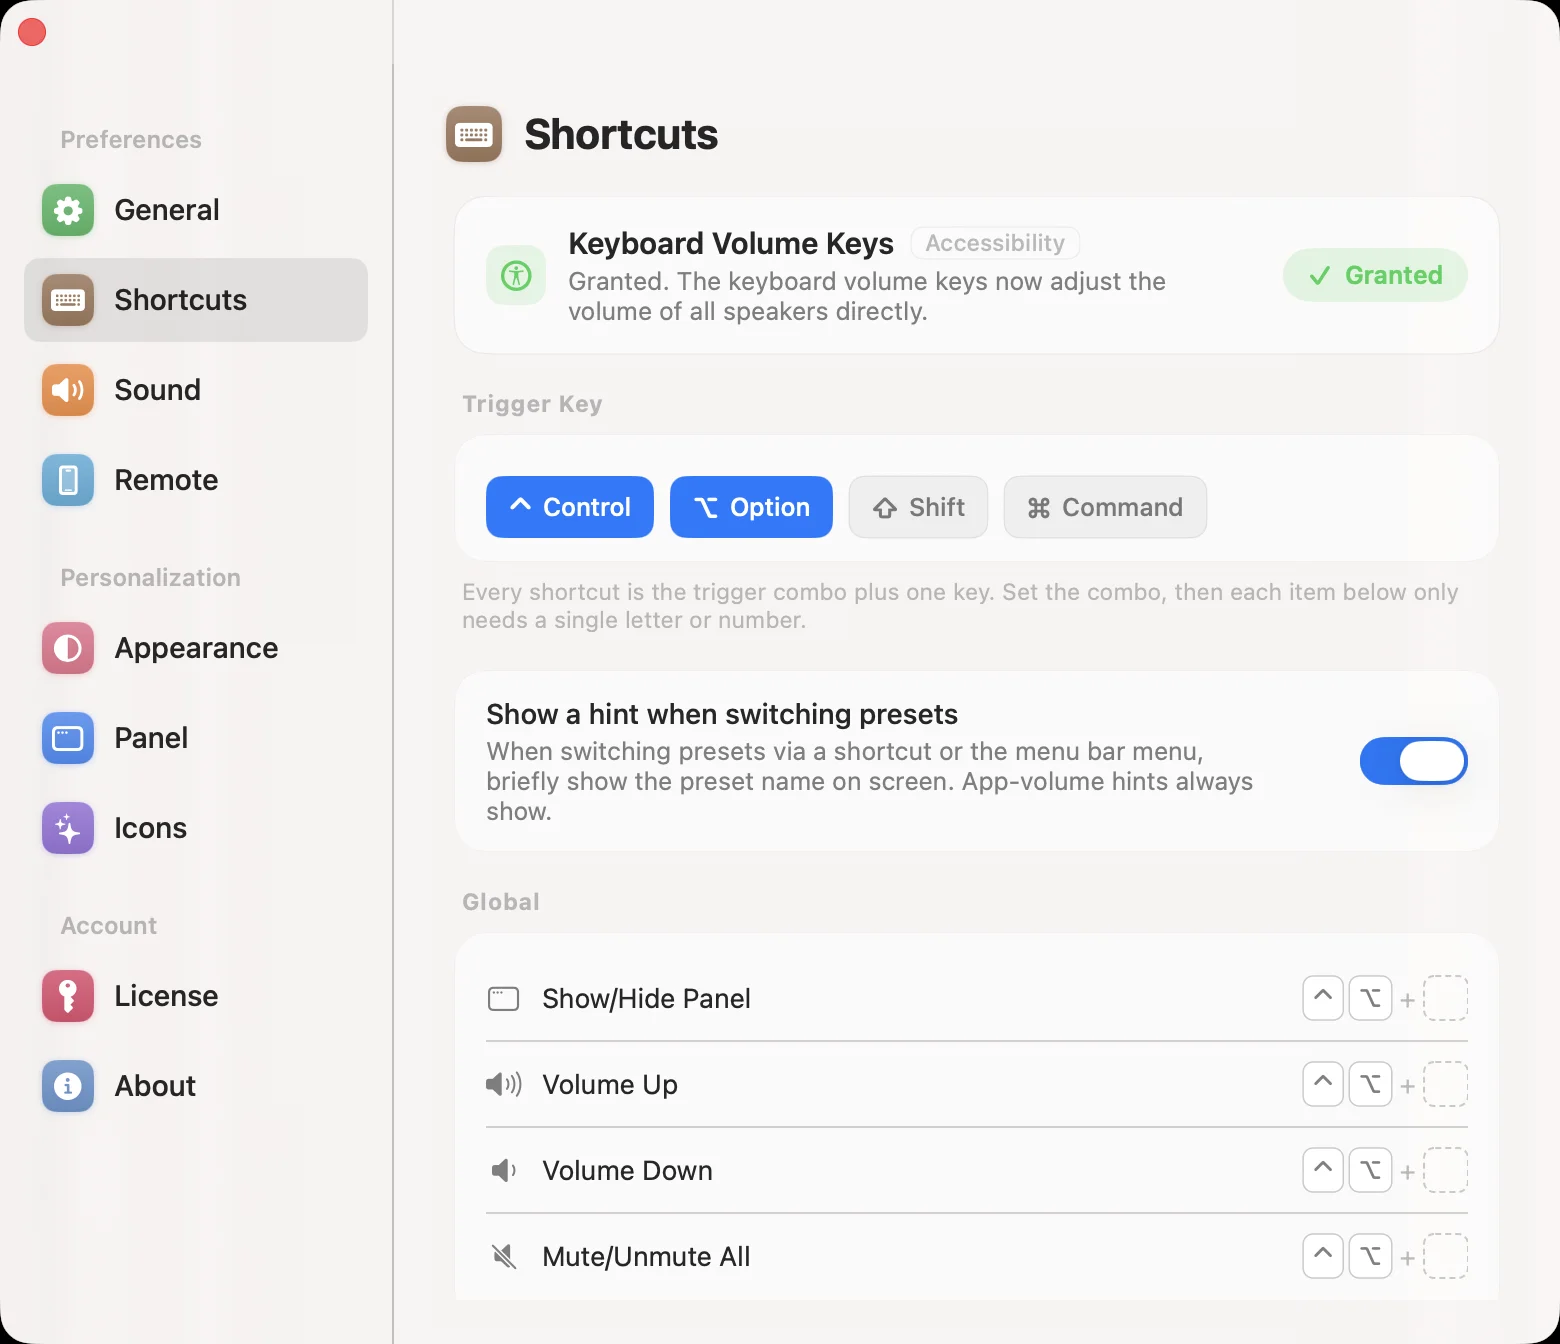
Set hotkeys that fire in any app — no need to bring Tutti to the front. Bind keys for the panel, the master output, the playing app, any specific app or device, and individual presets. Use it to mute everything the moment a call starts, or nudge the music without leaving what you're doing. Open Settings → Shortcuts, click an action, and press the keys you want.

TargetAction
PanelShow/hide the panel
Master outputVolume up · Volume down · Mute / unmute everything
Playing appVolume up · Volume down · Mute / unmute
Specific appeach app gets its own keysVolume up · Volume down · Mute / unmute
Specific deviceeach device gets its own keysVolume up · Volume down · Mute / unmute
Presetseach preset gets its own keyApply the preset
Shortcuts settings pane with the trigger-key combo and global actions ready to bind

Raycast

Pro

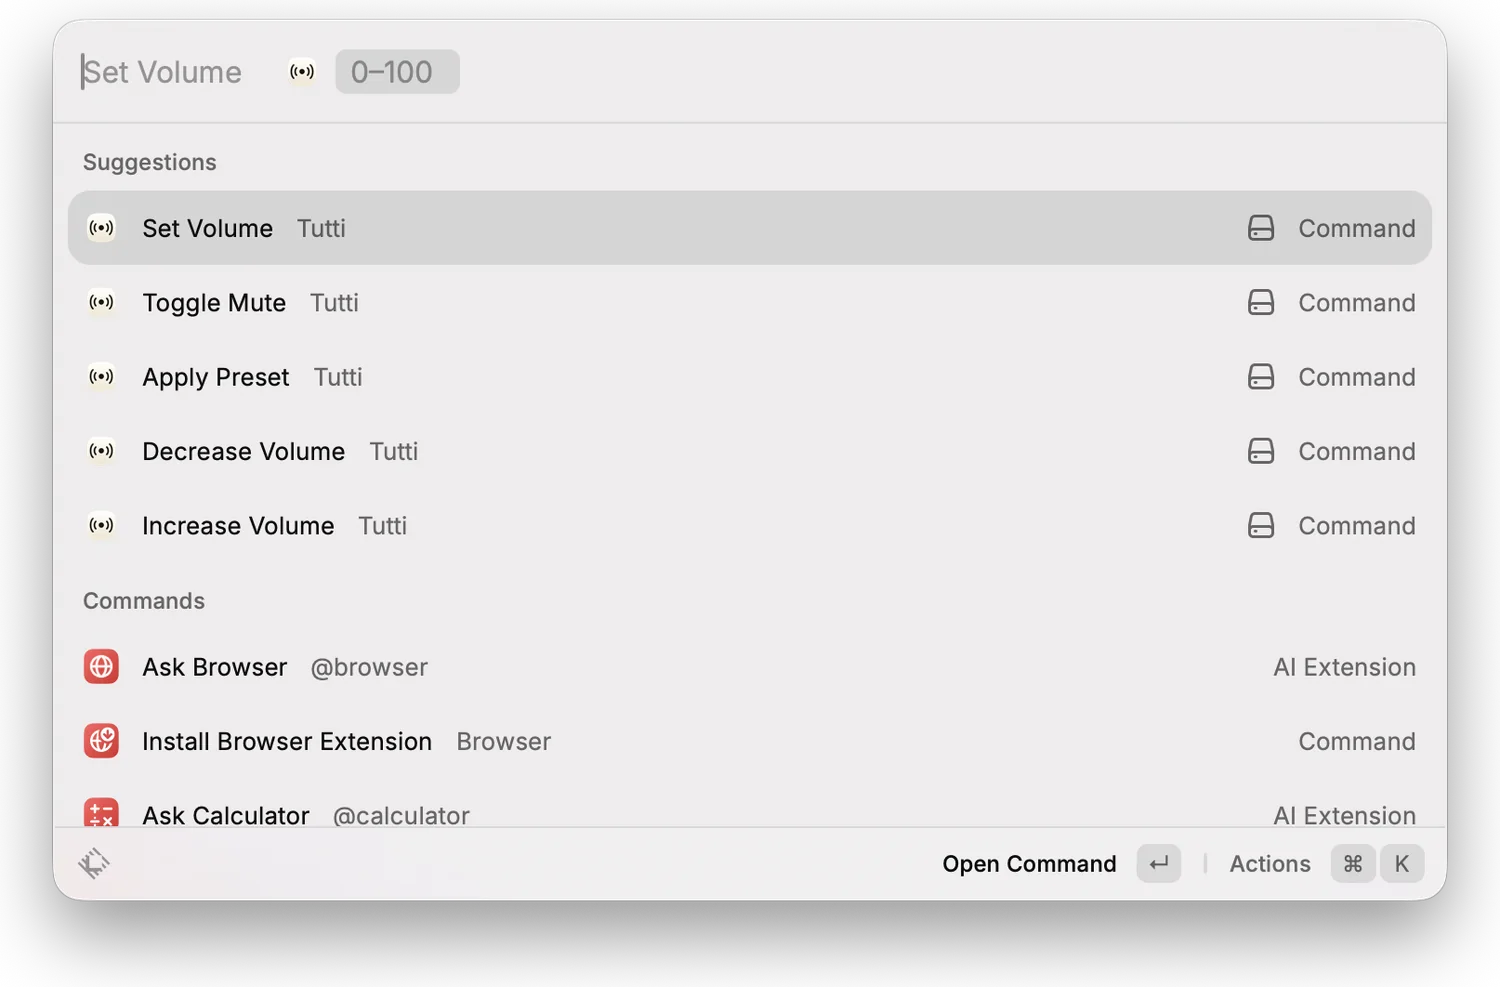
Use Raycast? Tutti's actions show up there too — set the volume, toggle mute, or apply a preset straight from Raycast, with no setup. Reach for it if Raycast is already your launcher. Just start typing an action like "Set Volume" and run it; it's the same set of commands Tutti gives Shortcuts and Spotlight.

Raycast showing Tutti's Set Volume / Toggle Mute / Apply Preset commands

Desktop widgets

Pro

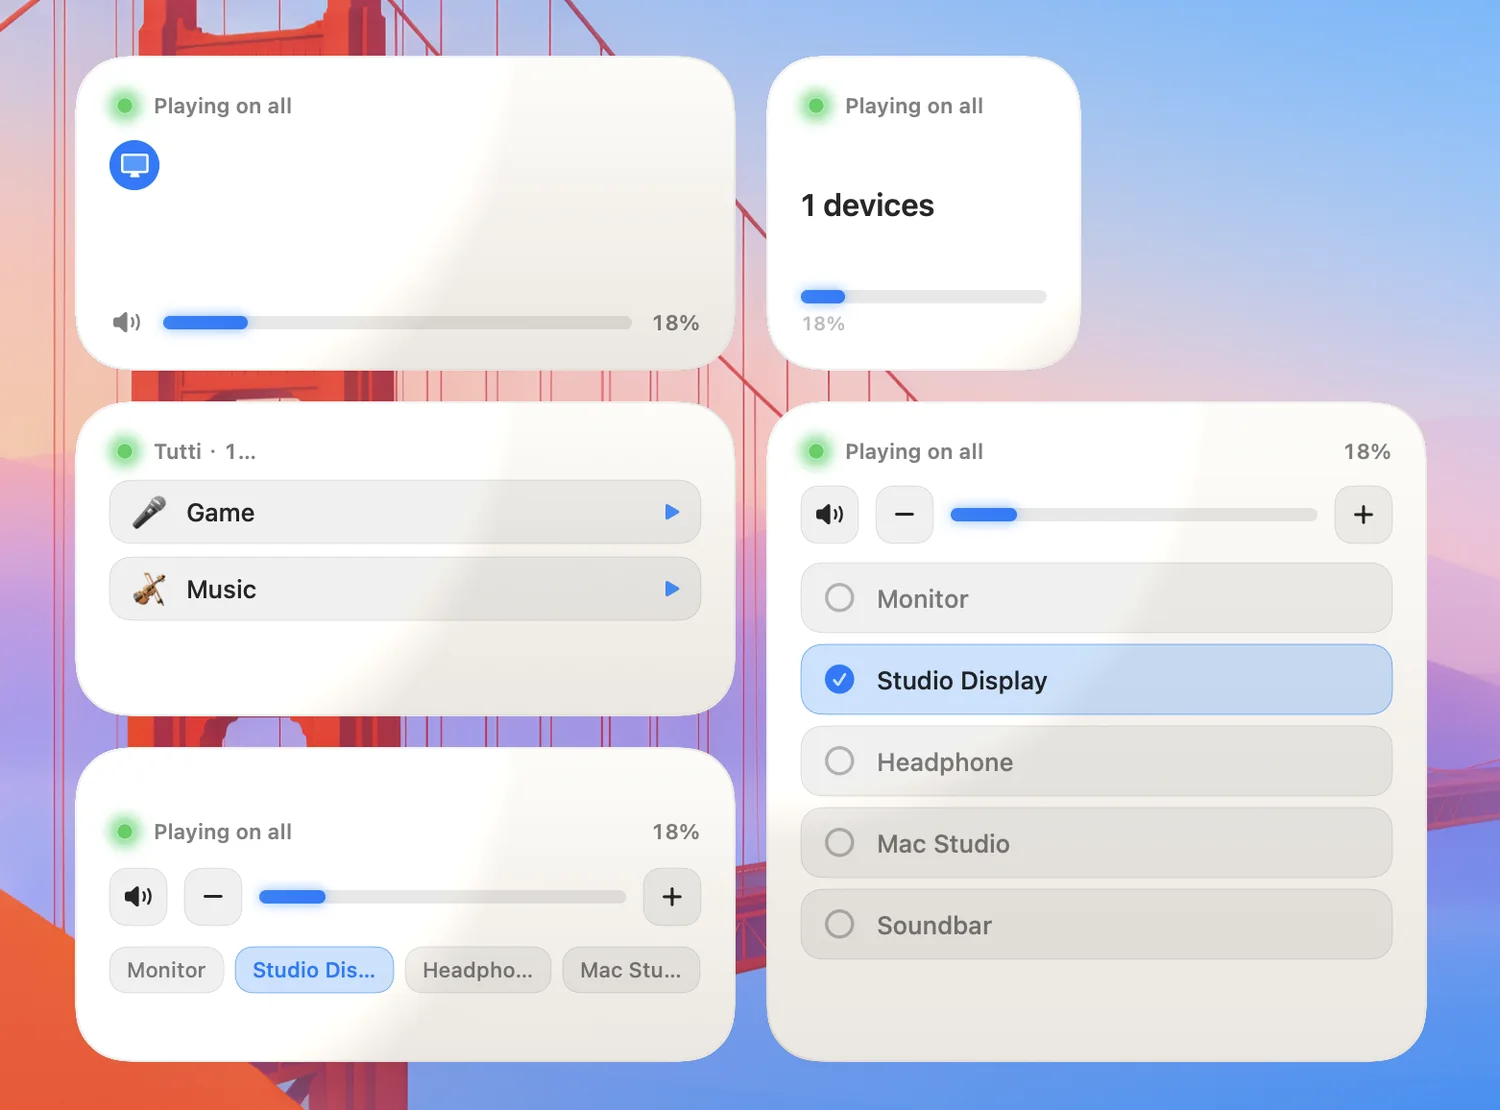
Put your output status and devices on the desktop or in Notification Center, and adjust volume, mute, output, or presets without opening the app. Use it if you change setups often and want them one glance away. Add Tutti's widget from the widget gallery and pick the size you like.

Tutti desktop widget showing output status and controls

9. Layout & devices

Arrange the panel your way

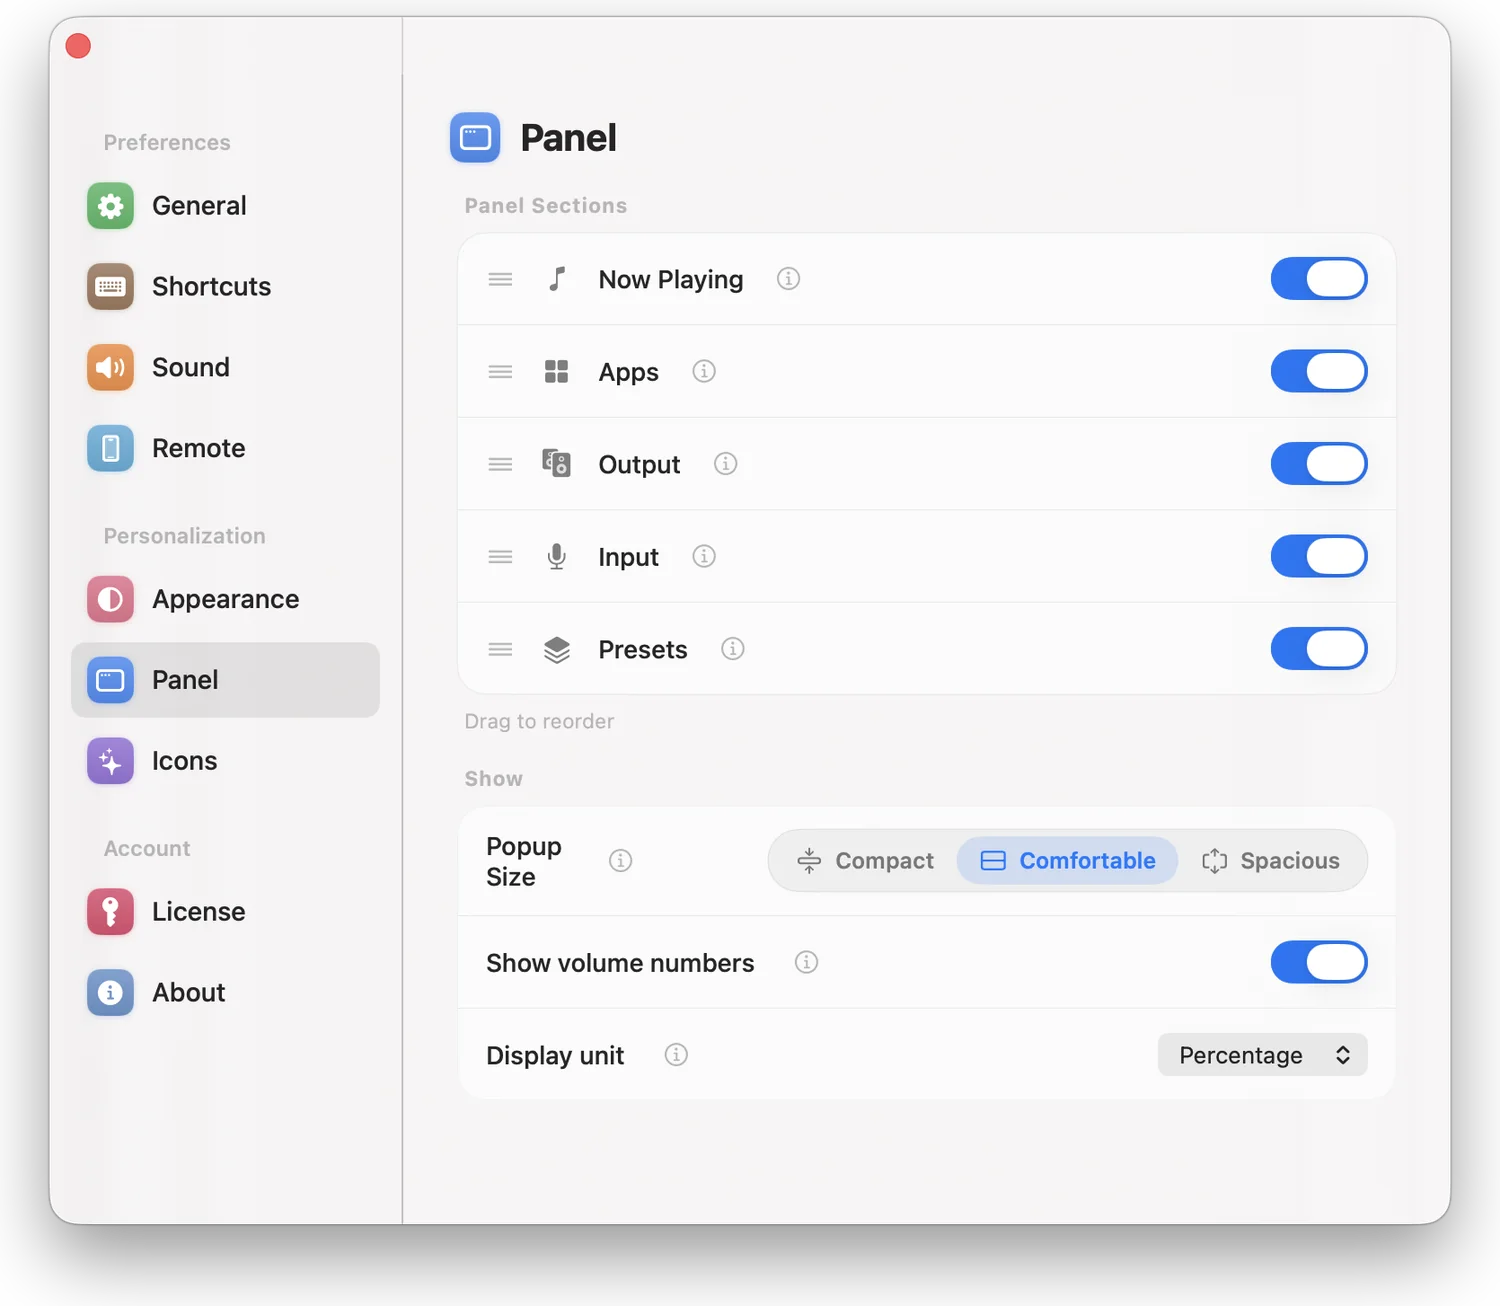
Turn the panel's cards on or off and drag them into your preferred order. Outputs, Apps, Input, and Displays can each follow the Popup Size or stay fixed at One Line or Two Lines. Open Settings → Control, then use the layout button beside the card's visibility switch; the choice applies immediately and is kept separately for each card. While Settings is in front, the real menu panel appears beside it as a live preview when space permits. Switching to another app hides the preview and keeps Settings open; returning restores your editing context. Clicking the menu-bar icon returns to background Settings or closes the foreground Settings interaction.

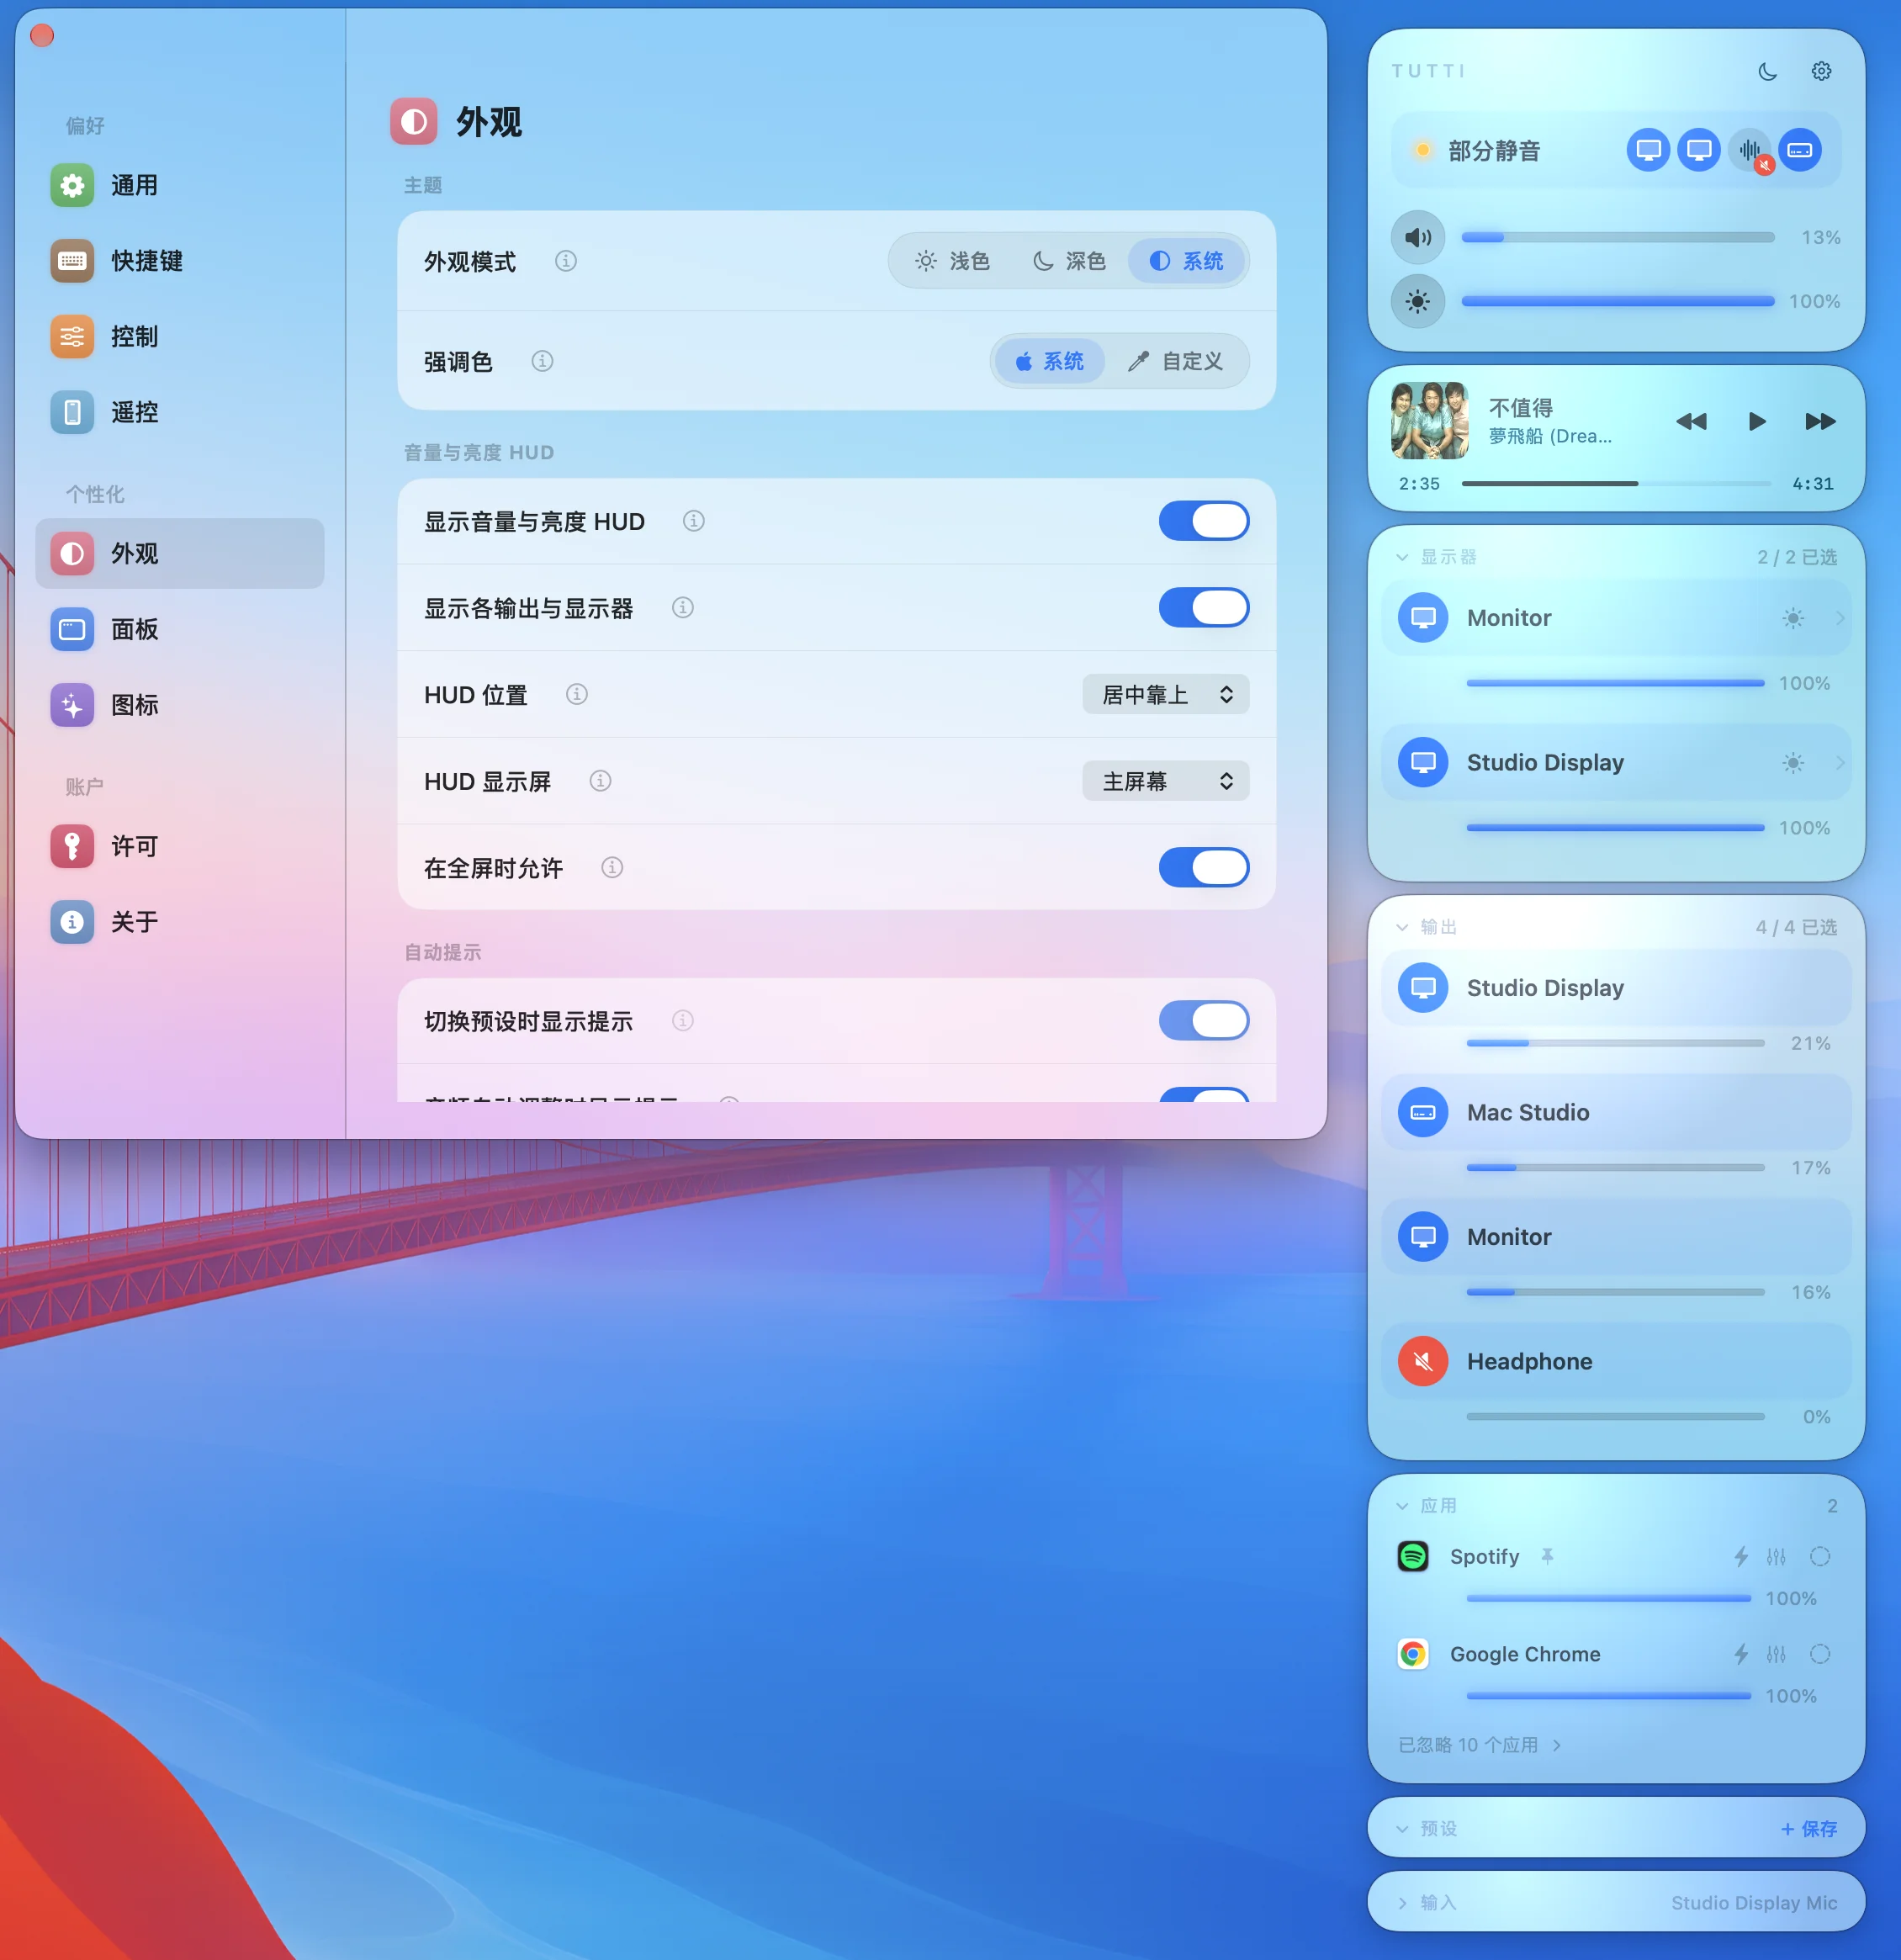
Panel settings with the Displays layout popover open and One Line selectedTutti 1.11.0 (30), Chinese UI: Appearance settings beside the real menu panel companion preview

Rename and hide devices

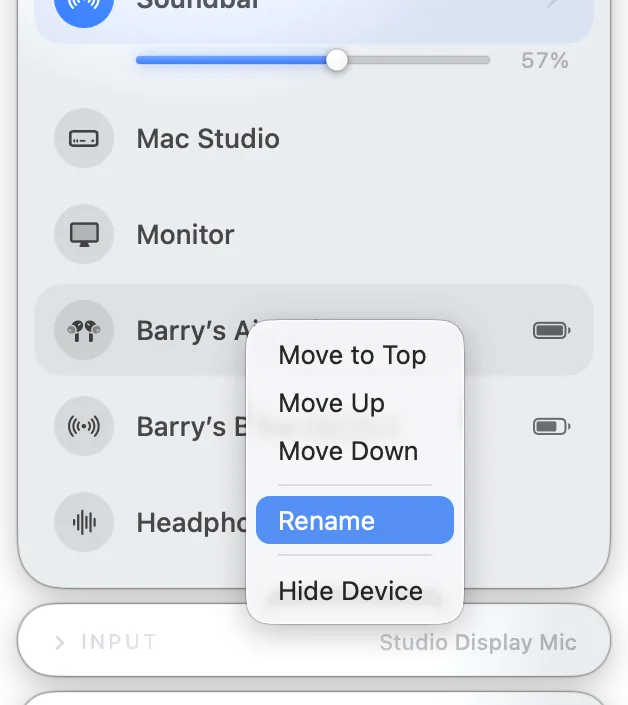
Give any output a friendlier name and tuck away the ones you never use, keeping the list short. Use it when system device names are cryptic or you have outputs you never touch. Rename or hide from the device's menu; hidden ones come back any time from the bottom of the list.

Device menu with Rename and Hide options

Sleep timer

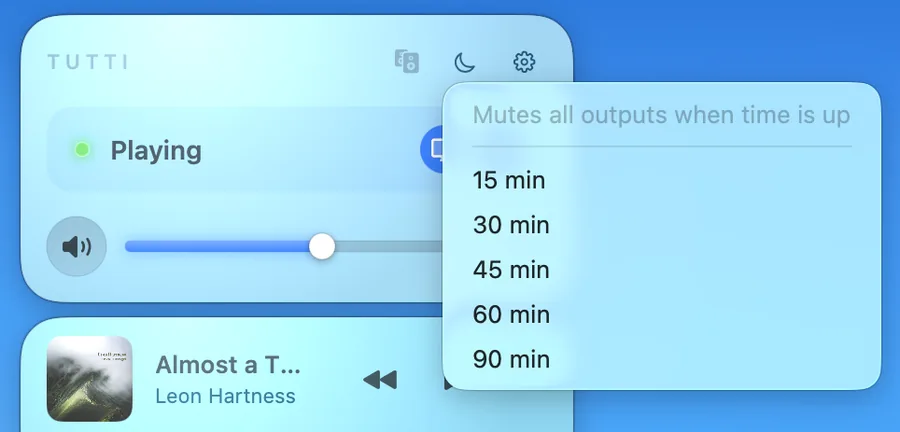
Set a timer and Tutti pauses playback and gently fades every speaker to silent when it runs out — no music playing to an empty room all night. Use it to fall asleep to music without leaving it on till morning. Pick a duration in the panel and let it count down.

Sleep timer counting down in the panel

Choose your menu bar icon

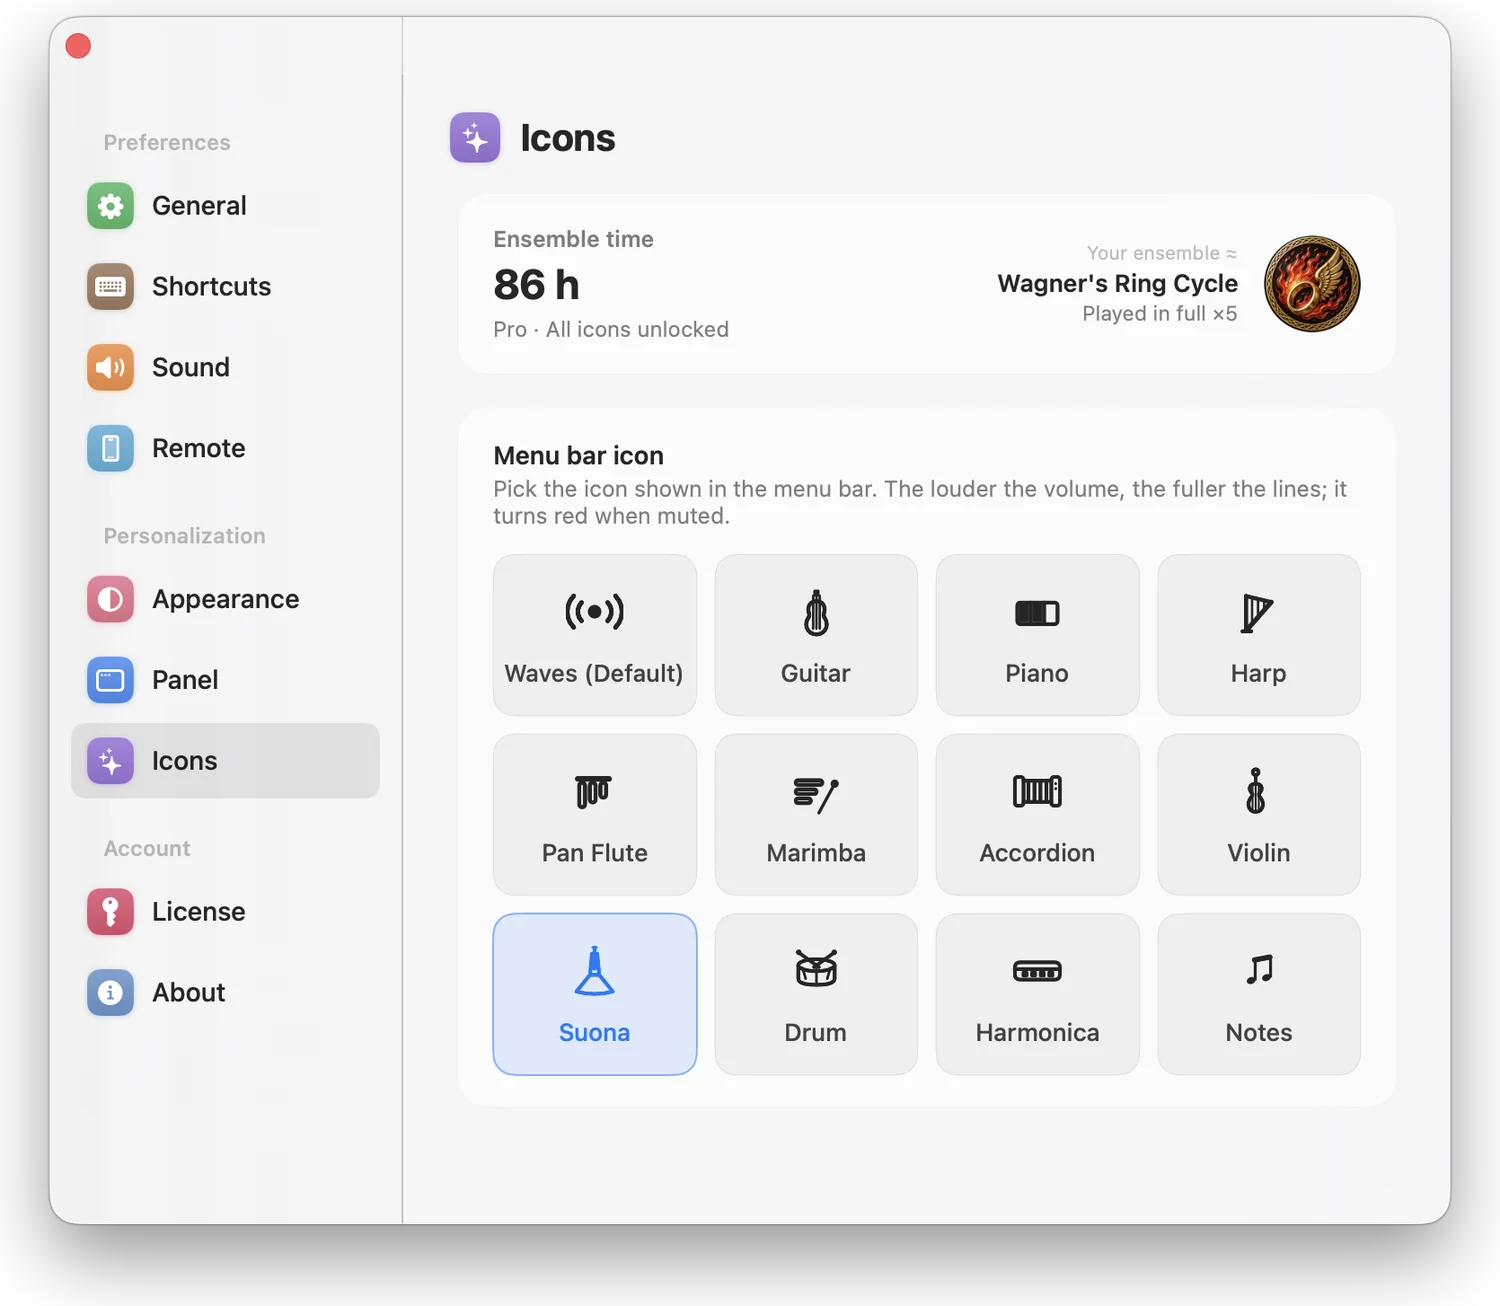
The default Tutti icon uses a sun and sound-wave design. Its waves reflect volume; mute uses the flat-wave shape in red. An unmuted volume of 0% does not turn it red. Choose the icon in Settings → Appearance. The default is free. Instrument icons unlock with multi-output listening time; Pro unlocks them all immediately.

Tutti 1.10.0 icon reference rendered from production artwork: the default sun-and-wave icon and instrument options

10. iPhone remote — Tutti Remote

Pro

Tutti Remote is a free iPhone app that turns your phone into a remote control for the copy of Tutti running on your Mac — change what's playing, adjust volume, and switch setups from across the room. Controlling your Mac needs Tutti Pro there.

Download on the App Store
Scan to install on iPhone Scan to install on iPhone

Pairing your iPhone

  1. 1 On the Mac, open Settings → Remote in Tutti to show a short 4-digit pairing code.
  2. 2 Open Tutti Remote on your iPhone; it finds your Mac on the network automatically.
  3. 3 Type the code into the iPhone to pair the two — you only do this once.

Both devices must be on the same Wi-Fi network, Tutti must be running on the Mac, and the Mac needs Tutti Pro.

What you can do from your phone

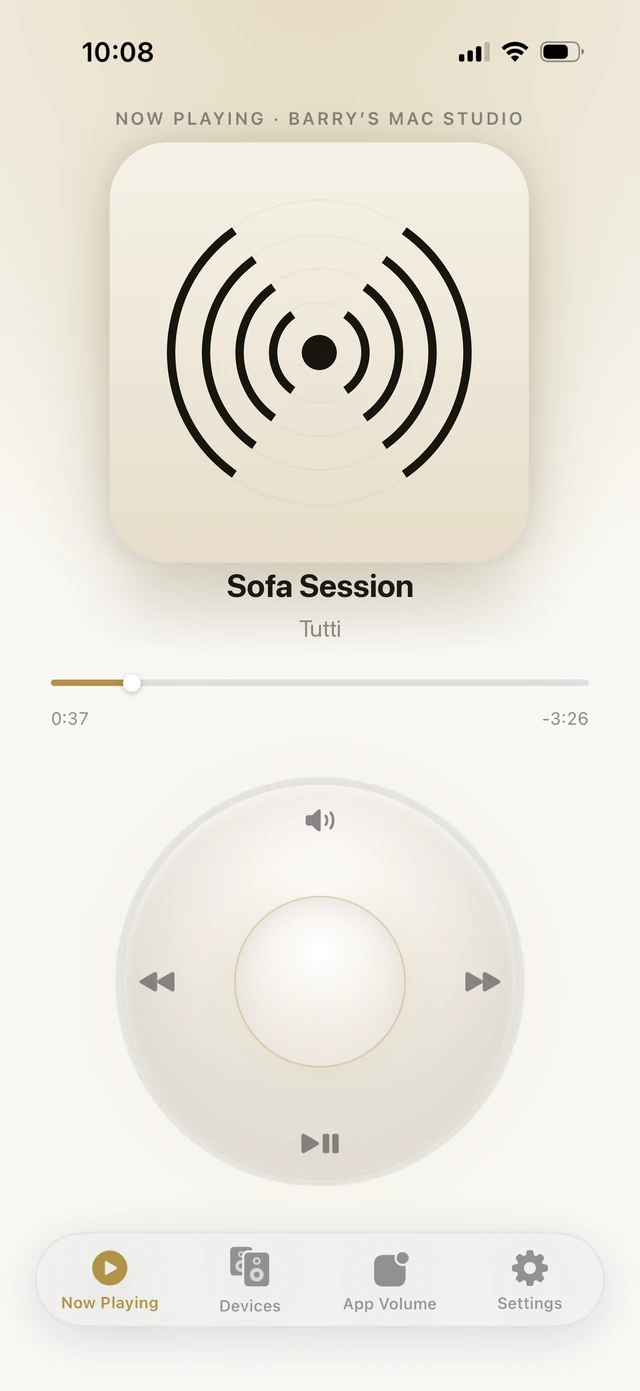
Switch presets, pick output devices and set each one's volume, control master volume and mute, change the input source, drive playback with a turntable-style control, and set per-app volume.

Tutti Remote on iPhone: turntable playback control and device list

11. Troubleshooting

I paid but haven't received my license key — what should I do?

Your key is emailed by Dodo Payments right after checkout, from a dodopayments.com address. If it's not in your inbox within a minute, check your spam or junk folder first — Apple/iCloud accounts in particular sometimes file it there. Still nothing? Email support@barrybarrywu.com from the address you bought with, and I'll resend your key, usually within 1–2 business days.

My license won't activate — what should I check?

First make sure you're online, since activation talks to the payment provider once. Each license works on one Mac; if you've hit the limit, open Settings → License on a Mac you no longer use and deactivate it to free a slot. Check the key was pasted with no extra spaces. If it still fails, email support@barrybarrywu.com.

How many Bluetooth speakers can I use at once?

macOS does not guarantee a fixed number. The more Bluetooth speakers play at once, the harder the wireless connection has to work, so four speakers may stutter, disconnect, or leave one silent. Tutti improves stability by choosing a reliable device to keep the group in time, correcting gradual drift, and trying to return a speaker after a brief drop. It cannot increase the Mac's Bluetooth capacity. If trouble continues, use fewer Bluetooth speakers or mix in a wired output.

The sound drops for a second when I add a speaker — is that normal?

A brief interruption can happen while macOS and the speaker reconnect. Tutti tries to keep the other speakers playing and return a briefly disconnected speaker to the group, but recovery still depends on macOS, the speaker, and the wireless environment. If it keeps dropping, reconnect that speaker or use fewer Bluetooth speakers.

I can't hear one particular app — where did its sound go?

Check whether that app is set to a different speaker under per-app output, or was ignored from the panel. Open the panel, find the app, and confirm its output and volume; if it isn't listed, it may be in your ignored list — bring it back from the bottom. Per-app features need macOS 14.4 or later.

How many Macs can Tutti Pro run on, and how do I move it?

One Tutti Pro license activates on one Mac at a time. To move it to a new Mac, open Settings → License on an old one and deactivate, which frees a slot immediately, then activate on the new Mac. There is no waiting period.
The iPhone remote won't connect to my Mac — why?

The remote needs both devices on the same Wi-Fi network, Tutti running on the Mac, and Tutti Pro active there. Open Settings → Remote on the Mac to show the pairing code, then enter it on the iPhone. If they still don't find each other, check that your network doesn't isolate devices from one another — some guest and public networks do.

Do I need to keep Tutti open for everything to keep working?

Yes — Tutti does its work while it's running in the menu bar, so multi-speaker output, per-app volume, and the rest are active only while it's open. Turn on launch at login and it's ready in the background from the moment you sign in. If you quit it, macOS goes back to sending sound to a single output.

12. Problems & feedback

The app crashed or is acting up

First, skim the existing issues — someone may have hit the same thing. If it's a crash or odd behavior, open Settings → About, click the Tutti logo ten times to turn on Diagnostics mode (it records only device and runtime status, never any audio), reproduce the problem, then tap Export log file below and email the file to support. Send it by email rather than posting it in a public issue — the log can contain local file paths.

Email support

Suggest a feature

Have an idea or a request? Open a GitHub issue so others can weigh in, or just email support if you'd rather keep it private. Both reach me.

Open a GitHub issue

License, payment, refund & privacy

For anything about your license, a payment, a refund, or your privacy, email support. Include the email you bought with, your Payment ID, and roughly when you paid, so I can find your order quickly.

Email support